Scan Your Photos
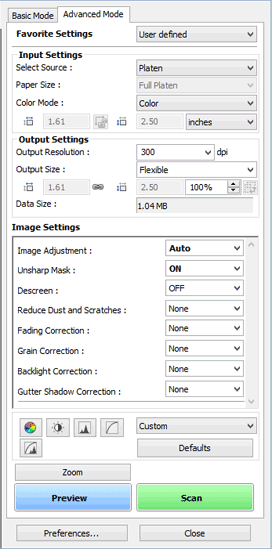
Canon ScanGear Avanced Mode
 The Advanced mode allows great flexibility, and this will save some time and work in the image editing software if you get the adjustments right for the needs of the pictures you are scanning.
The features we will discuss on this page are available in other advanced scanning software. So, let's take a look:
Input Settings
Select Source: Platen. In addition to platen you have some film choices. Platen is the right choice for printed pictures or other documents on paper. Color Mode: can be changed to Grayscale for "black & white" pictures which actually have many shades of gray in addition to black and white in them. Black and white means exactly that. No grays are in the picture or document. 48-bit Color refers to a deeper color depth of an image. The image contains more than the 16 million colors that 30-bit color images do. This selection tells the computer to reserve more memory space for each pixel that makes up the picture. The next line refers to the dimensions of the image to be scanned. The aspect ratio can be locked or unlocked with the tiny padlock. This can be expressed in inches or pixels. Drag your curser to make a rectangle around the portion (or all) the image you want scanned, and these dimensions will be expressed in these boxes.
Output Settings
Resolution defaults to 300 dpi which is the minimum you should scan for a photo collection that will include print-quality images along with those intended for other destinations. The drop-down list box lists a number of options from 75 to 1200, and you can enter your own choice that is somewhere in between those listed. Output Size allows you to preselect the size your new image will be. There are some options in the drop-down list box, and you can enter your preferred size in the boxes. Flexible will give you an image the same size as the original. The chain image between the boxes tells you that the aspect ratio is locked. If you want to change that, you'll have to crop your new image in your editing software later. This is where you have the opportunity to enlarge your small images. The box with the default 100% showing is an easy place to do that. Date Size is for your information. If you are making an image that is too large, you will be able to see it in the data size.
Image Settings
By no means do you need to use all of these settings, but if one or two tweak your scanned image enough, you may be able to bypass image editing for almost all of your pictures. Even if the picture is not straight on the scanner platen, ScanGear corrects the alignment problem!
- Image Adjustment: Tell ScanGear What you are scanning: a Photo, Magazine picture, Document (primarily text), or Auto accepts default settings.
- Unsharp Mask: In spite of it's name, this setting sharpens the edges in your picture.
- Descreen: This removes some of the texture that is in items produced by commercial printers, such as magazine pictures.
- Reduce Dust and Scratches: You have a choice of None, Low, Medium, or High. Actually, this introduces a little (or a lot) blurring to the scan. Test it to see the results.
- Fading Correction: Choose None, Low, Medium, or High. You just have to test these settings on your picture to see if the results are helpful or overdone.
- Grain Correction: Choose None, Low, Medium, or High. You just have to test these settings on your picture to see if the results are helpful or overdone.
- Backlight Correction: This attempts to correct the problem where your subject is in shadow because the lighting is behind it instead of in front or at the side.
- Gutter Shadow Correction: Choose None, Low, Medium, or High. Use this when scanning books.
 Saturation/Color Balance: When clicked, a box with color and saturation adjustments will pop up. Your adjustments will show up in the image in the ScanGear's preview window. It's often beneficial to increase the saturation of landscape pictures a bit.
  Brightness & Contrast: This is a slider to lighten or darken the image, and one to increase or decrease the contrast. The preview reflects your adjustments.
 Black & White Points (Levels): This box shows the tone levels of your picture. You can adjust the slider to lighten or darken your image. The eye droppers are powerful tools to adjust the levels of your picture. The first adjusts the level of shadows (see the tool tip description) Click the dropper to select the tool then click the darkest part of the picture you are adjusting. Now select the dropper on the right (highlight adjustment) and click the lightest part of your picture. Most pictures will show a great improvement in the contrast.
 Tone Curves: Tone curves are another way to adjust brightness and contrast in a picture. About ¼ of the way up from lower left drag the diagonal line down just a little to darken the picture. Then about ¾ of the way to upper right drag the line up a little to increase the brightness. This gives you a long lazy S shape in the diagonal. This improves the contrast and saturation of the picture.
Experiment
Be sure you images are saved under unique names. Experiment with the settings and save the results, perhaps with a name that indicates what adjustments were active, so you can compare the results and use those you prefer.
If additional adjustments need to be made, it's time to fire up your favorite image editing program. But we will talk about file formats and storage locations before we get into the editing. Just bear with me we'll get there in a bit.


