Scan Your Photos
ScanGear Basic Settings
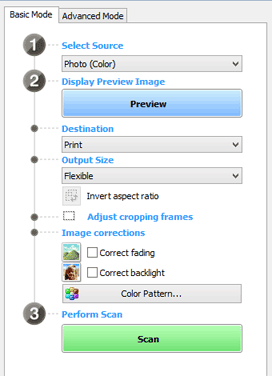
 The image at the right is the adjustment panel for ScanGear's Basic mode. Choose Print as the Destination for most of your scans. This will give you a 300 dpi image which is needed for an image of sufficient quality for printing. Flexible is selected as the output size which will create an image the same size as the original scanned. In addition to Flexible, the drop-down list offers several pre-determined sizes. Adjusting cropping frames can be a time saver. Experiment with turning this off and on to see the results in the ScanGear preview window.

The picture on the left was scanned with no fading adjustment. That on the right had the fading adjustment checked. The backlight correction brightens the picture. I'll let you experiment to see the effect. When you feel you're ready, click the Scan button.


