
Reports
Only a few of the reports need some explanation. The Entire List opened from the Main Menu is one of those. It will list all of the active people in the database, but not the organizations. Bear in mind that there is a check box on the Members Entry/Edit form that indicates whether a person is considered Active. If they do not attend meetings, come in to volunteer, or have any contact with Mission Granbury, they are considered inactive, and the check in the box should be cleared. Most lists are limited to people who are active in some way. If an person does not show up on this list, check the status of the Active check box in their record on the Members entry/edit form.Mailing Labels and Envelopes for Mailing List are both based on the Query: qry-MemberNames - Sorted Zips, they are the same list in different forms. The Active member list is sorted by 5-digit zip codes for economical mailing. Names within each zip code are alphabetized.
Mailing Labels and Envelope for Mailing List are both based on the query, qry-MemberNames - Sorted Zips, e.g. they will produce the same mailing lists. The envelope is a #10 business envelope. It can be noted that this envelope, env-#10-MemberNames-Sorted Zips can be copied and pasted with another name and the Record Source of the report changed to a different query.
Recycle a Report
Here's How: Comment: The process takes longer to write than it does to accomplish the task.
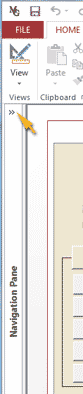
- Open the Navigation Pane by clicking the >> icon. (See the gold arrow in the image at the right.)
- Copy and paste env-#10-MemberNames-Sorted Zips into the Search... box just below the ALL Tables label at the top of the Navigation Pane. Press the Magnifying glass icon button.
- Press the double down arrows to the right of either tbl-Members or tbl-Lookup_Zip to expose the object (report) you are looking for.
- Right-click the report name and choose Copy.
- Move your mouse curser down a little, right-click the empty space in the Navigation Pane, and choose Paste.
- The Paste As dialog appears with the report name highlighted. Choose a new descriptive name such as env-Gala, env-Donors, env-Prospects, or what-ever.
- Search for your new report name. When it appears in the main Access window, right-click it and choose Design View.
- Right-click your new report, and choose Properties at the bottom of the context window.
- On the Property Sheet, Open the drop-down list box below the label Selection type: Section. Click the down arrow on the right edge of the list box. Choose Report.
- Be sure the Data tab is in focus below the same list box that now shows Report in it. The first selection in the Data tab is Record Source. qry-MemberNames - Sorted Zips is listed as the record source. Now open the drop-down list box that holds this value (click the down arrow) and choose a different query.
- Now save your new envelope. Click the floppy disk icon next to the MG icon at the very top of the Access window.
Envelope: Custom List depends on qry-CustomList - Sorted Zips. The button above this, Query: Custom List Opens the query in design mode. See Query Help for instructions. You can print envelopes for your custom list.
Query: No eMail opens a query which lists all records in the Members table with no eMail address listed to alert people that they must use other means of communication.
The last report on the Main Menu is Fill-in Name Envelope. That's exactly what it is. Fill-In Name and Address opens the design window of a #10 business envelope. Spaces are provided for the user to fill-in the name, address, City, State, and Zip code. The cue text must be highlighted so that it will be deleted when the new text is entered. When ready to print, click the