Uptown Poncho
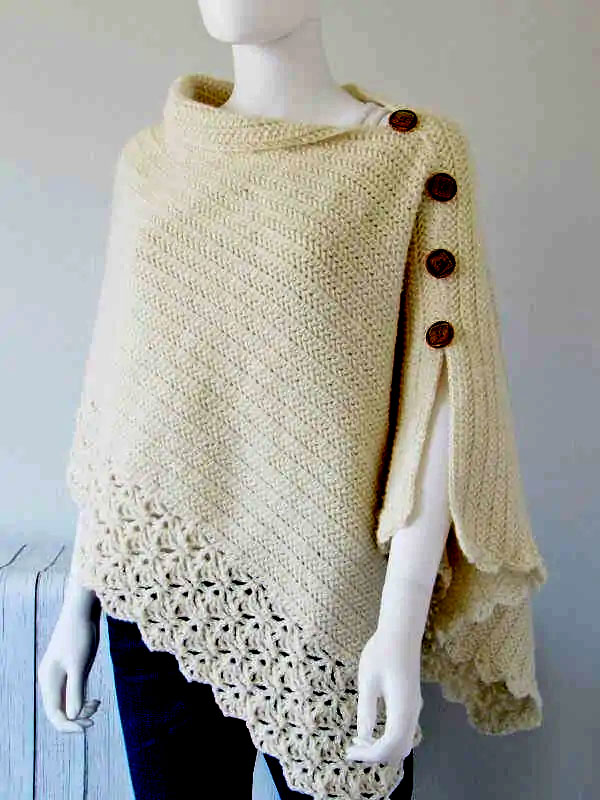
Uptown Poncho
Skill Level:
Finished Size: The measurements give the size of the rectangle before seaming.
- S/M- 64 inches long and 22 inches wide
- L/XL-66.5 inches long and 23 inches wide
- 2XL/3XL-69 inches long and 24 inches wide
Materials:
- Worsted weight(size 4) yarn. I would suggest a wool blend yarn for good drape. Lion Brand Wool-Ease in color Fisherman was used for the sample poncho.
- S/M – 6 1/2 skeins of Lion Brand Wool-Ease of 197 yards each
- L/XL: 7 1/2 skeins of Lion Brand Wool-Ease of 197 yards each
- 2XL/3XL: 8 Skeins of Lion Brand Wool-Ease of 197 yards each
- Hook J(6mm). Use any size hook to attain gauge.
- Tapestry needle to weave in the ends.
- 1-1/4 inch wooden buttons- 4 for size S/M and 5 for the bigger sizes.
Abbreviations, Notes and Tips:
- hhdc- herringbone half double crochet
Herringbone Half Double Crochet(hhdc): YO, insert your hook into the next st, pull up a loop through the st and the first loop on your hook, 2 loops left on your hook, YO and pull through the remaining 2 loops on your hook. - Lacy Shell: (dc, ch 1, dc, ch 2, dc, ch 1, dc)worked into the same st or ch-space.
Note: Stitch counts for bigger sizes are given in the order S/M(L/XL, 2XL/3XL)
- Foundation: Ch 211(219, 227). Initial chain should be a multiple of 8+ 3 for the lacy hem pattern to work.
- Row 1: 1 hhdc in the 3rd ch from hook and each ch across to end. Turn.—–209 (217, 225)hhdc
- Row 2: Ch 2 (counts as a hhdc), 1 hhdc in each st across to end. Turn.——-209 (217, 225)hhdc
- Repeat Row 2 45(48, 53) more times. Your work will measure close to 16 1/2(17 1/2, 19) inches.
Do not fasten off. Turn and work the Lacy Hem below.
Lacy Hem for Crochet Poncho
Note: The lacy hem is 5-1/2 inches wide for all the sizes. - Row 1: Ch 3 (counts as 1 dc here and throughout), (dc, ch 1, dc) in the same st as beg ch-3, ch 1, sk 3 sts, 1 sc in next, *( ch 1, sk 3 sts, 1 lacy shell in next, ch 1, sk 3 sts, 1 sc in next), repeat from * to last 4 sts, ch 1, sk 3 sts, (1 dc, ch 1, 2 dc) in last st. Turn.——25(26, 27) full shells + 1 half shell on each end
- Row 2: Ch 1, 1 sc in the same st as ch 1, ch 2, V-st in the next sc between shells, *(ch 2, sc in ch-2 space of next shell, ch 2, V-st in the next sc between shells), repeat from * until you work a V-st in the last sc, ch 2, 1 sc in beg ch-3. Turn.—–26(27, 28) V-sts
- Row 3: Ch 1, 1 sc in same st as ch 1, ch 1, lacy shell in ch-1 space of the next V-st, *( ch 1, 1 sc in next sc on top of shell, ch 1, shell in ch-1 space of the next V-st), repeat from * until you have worked a shell into all the V-sts, ch 1, 1 sc in last sc. Turn.—–26(27, 28)full shells
- Row 4: Ch 3, 1 dc in the same st as ch 3, ch 2, 1 sc in the ch-2 space of next shell, *(ch 2, 1 V-st in the next sc between shells, ch 2, 1 sc in the ch-2 space of next shell), repeat from * until you work a sc in the ch-2 space of the last shell, ch 2, 2 dc in last sc. Turn.——-25(26, 27) V-sts
- Row 5: Ch 3, (dc, ch 1, dc) into the same st as ch 3, ch 1, 1 sc in next sc on top of shell, *(ch 1, 1 shell in ch-1 space of next V-st, ch 1, 1 sc in next sc on top of shell), repeat from * until you have worked a sc in the last sc, ch 1, (1 dc, ch 1, 2 dc) in beg ch-3. Turn.——25(26, 27) full shells + 1 half shell on each end
- Repeat Rows 2-5 once and then Rows 2 and 3 once. Do not fasten off. We will continue with the working yarn once the poncho is seamed. Fold the rectangle along its length, leave a 13 1/2 inch opening for the neck and using mattress stitch, sew for about 10 inches. The rest of the length is left open for the sleeve slit. Adding Sleeve Edging
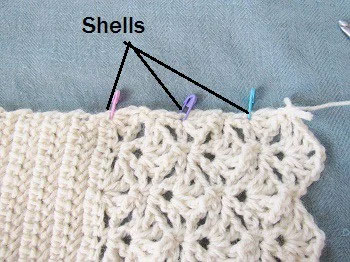
- 1. Shells will be worked into the base of the half shells
- Now pivot your work and work along the shorter side of the rectangle to add shells to the sleeve edges. Place a marker at the base of the 3 half shells on the edge as shown in pic 1 above. You will work shells into these marked spaces.
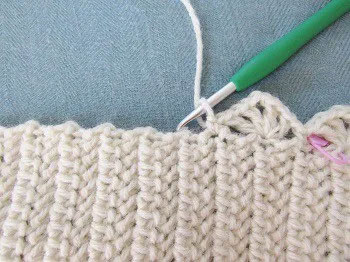
- 2. Shows 3 shells completed along the edge
- Work 1 more sc in the corner where you have your working yarn, working along the side of the lacy rows, ch 1, 1 shell in the first marked space, ch 1, 1 sc in the middle of the 2 markers, ch 1, shell in the next marked space, ch 1, 1 sc in the middle of the 2 markers, shell in the last marked space, ch 1, 1 sc at the base of the 3rd hhdc row.
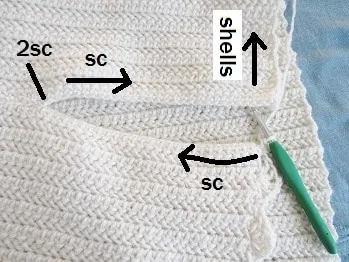
- 3. Work one shell across 4 rows a
- 4. Shows how the edging is continued up the sleeve slit and onto the backside
- Continue working one shell per 4 rows on an average until you reach the arm slit (pic 3), work sc distributed evenly along the side of the slit, 2 sc at the base of the slit and sc distributed evenly down the second side of the slit (see pic 4), continue to work shells across the backside of the poncho until you hit the hem and fasten off. Finishing
- Weave in any tails left.
- Sew the wooden buttons onto the seam.
Sleeve Detail

Sleeve Detail
Sleeve Detail
Sleeve Detail