Cable Pillow
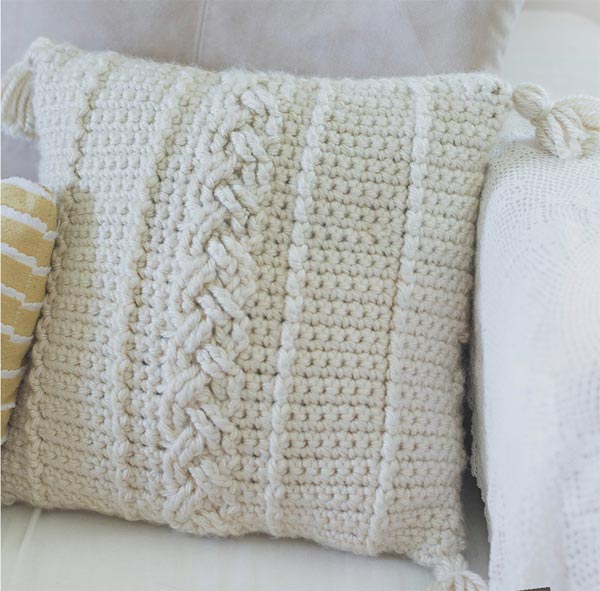
Cable Pillow
Skill Level:
Finished Size: 16" x 16"
Gauge: 1 rows by 9 single crochet equals a four-inch square
Materials:
- 3 skeins of Lion Brand Hometown USA in Los Angeles Tan
- 9mm Hook (N)
- Yarn needle
- Two to three 3/4 inch buttons (read notes on these)
- 16x16 inch pillow (you could create your own!)
- Sewing pins
Notes and Tips:
- For this pattern, I did not create button holes for the buttons that are on the back, because my buttons were just the right size to fit snuggly through the stitches (3/4 inch). I would suggest testing if your buttons will fit through your stitches before sewing them on!
- chains at the beginning of the rows do not count as a stitches
- ***All fpdc in rows 4 & 6, along with repeats of these rows are to be worked into the post stitch below it-- not the single crochet stitches from the previous row***
- Front:
- 1) ch 39, in 2nd ch from hook, sc and across (38 total sts, and for the remainder of the rows)
- 2) ch 1, turn, sc 6, fpdc, sc 6, fpdc, sc 2, fpdc 6, sc 2, fpdc, sc 6, fpdc, sc 6
- 3) ch 1, turn sc across
- 4) **read notes on fpdc's** ch 1, turn, sc 6, fpdc, sc 6, fpdc, sc 2, sk 2 fpdc, fptr 2, then working BEHIND your work, work a fptr into the both of the two skipped sts, fpdc 2, sc 2, fpdc, sc 6, fpdc, sc 6
- 5) repeat row 3
- 6) ch 1, turn, sc 6, fpdc, sc 6, fpdc, sc 2, fpdc 2, sk 2 fpdc, fptr 2, then working in FRONT of your work, fptr into both of the two skipped sts, sc 2, fpdc, sc 6, fpdc, sc 6
- Repeat rows 3-6 eight, until you get to row 42
- Finish off and weave in ends
- 1) ch 39, sc in 2nd ch from hook, and across (38 total sts, and from here on out)
- 2-24) ch 1, turn, sc across
- Finish off, and leave one very long end for sewing the pillow.
- First, you'll gather your pieces and put them "wrong sides" together. With your front piece laying upwards, with the cables on the inside.
- You'll layer your back pieces in the middle, aligning the edges up. Then pin it together.
- Sew around the edges, with your long tail you left for one of your back pieces and your yarn needle. I just used a simple running stitch. Once you get all the way around, tie a knot and then weave in the rest of your ends and flip the pillow cover right side out.
- Then you're going to sew on your buttons. I used two buttons because that's all I had of this specific kind of button, and I was set on using them. Plus they were vintage buttons, so I wasn't going to find these puppies anywhere else. I say all of that because I would suggest actually using three buttons because I think that would hold all the cover together better over the pillow. But two totally does the job.
- IMPORTANT: Sew your buttons on the bottom layer. It just won't work out if you're trying to attach the bottom layer up above the layer on top of it to fasten the button. That make sense?
- Before you sew your buttons on- make sure that they will line up with a place that they will fit into.
- If you decide to add on tassels, follow this tutorial found here. I make them using my hand-- super simple. Also note that you will need a fairly long strand of yarn at the top of your tassel to attach them to the corners.
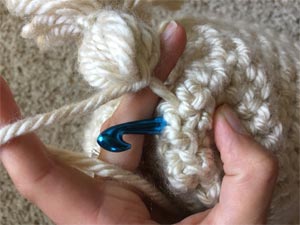
- To attach them, I stuck my crochet hook into the corner of my pillow and drew through one side of the long strand at the top of the tassel.
- Then I did the same thing with the other side of the strand from the tassel, except in a space very close to the one I just worked in-- not the same space. Then I tied a couple of knots on the inside with the two ends and wove them in. Just repeat that process for the four corners, then your comfy pillow is complete. :)
Back Side (make 2):

Pieces to be assembled
Assembly:

Attaching Tassel |
Attaching Tassel |