Bobble Pillow
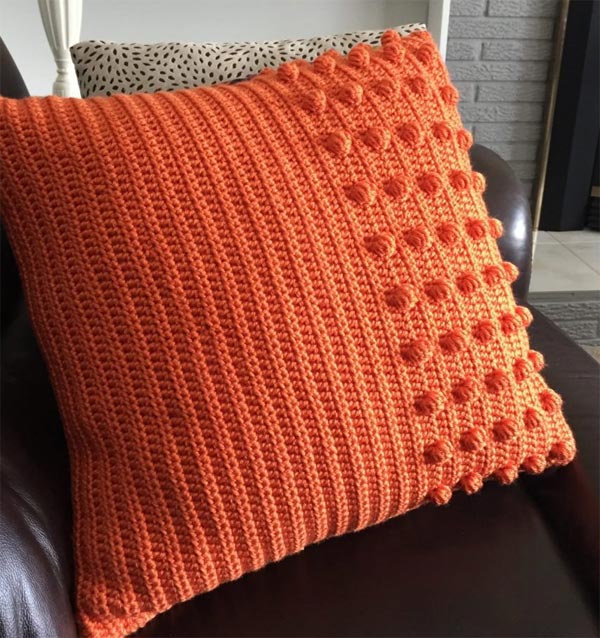
Bobble Pillow
Skill Level:
Finished Size: 18" Square
Gauge: 15 hdc by 11 rows 4-inch square
- Ch 17
- Row 1: Hdc in 3rd chain from hook and in each stitch across. (15 hdc)
- Row 2: Ch 2, hdc in each stitch across. (15 hdc)
- Row 3 – 11: Repeat Row 2.
- 3 Skeins of Red Heart Soft (#4) 256 yd / 5 oz (approx 665 yds used in the project)
- Size H 5.0 mm crochet hook.
- 18" X 18" pillow insert
- 16" zipper
- Sewing thread
- Sewing needle
Abbreviations, Notes and Tips:
- ch = chain
- st(s) = stitch(es)
- hdc = half double crochet
- dc = double crochet
- mbob = modified bobble stitch
- hk = hook
- [] = Repeat the instructions inside the brackets according to the number of times indicated after the brackets.
- Notes:
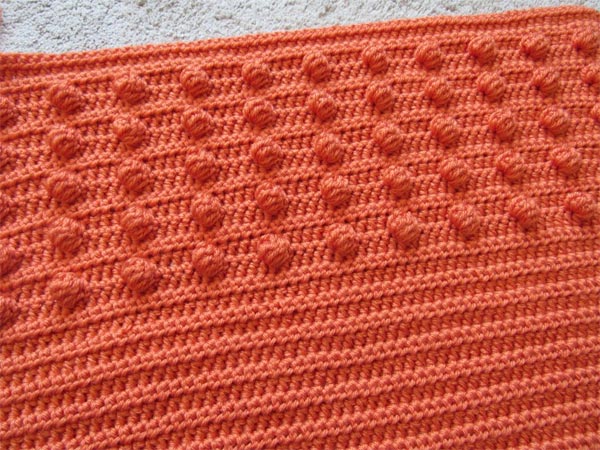
- Modified Bobble Stitch: Normally, bobble stitches are made by double crocheting 5 stitches together (dc5tog). To make the bobble stitch more pronounced while using a smaller crochet hook, I triple crocheted 5 stitches together (tc5tog). The key to this stitch is making sure to yarn over twice before inserting your hook into the stitch!
- The beginning jchain of each row does not count as a stitch.
- [] Repeat the instructions inside the brackets according to the number of times indicated after the brackets. Ex. [mbob in next st, sc in next 5 sts] 10 times, means you will make a modified bobble stitch, followed by 5 single crochet stitches, and this will be done a total of 10 times before moving onto the next instructions.
- Work the last stitch of each row in the beginning chain of the previous row. This will create a straighter edge.
- This pillow is made in two pieces (front and back panel) and sewn together on three sides, with a zipper on the fourth side.
Notes:
- Front Panel:
- Row 2) Ch 2, hdc in each st across. (66 hdc)
- Rows 3 - 4) Repeat Row 2.
- Row 5) Ch 1, sc in next 3 sts, [mbob in next st, sc in next 5 sts] 10 times; mbob in next st, sc in last 2 sts. (11 mbob + 55 sc)
- Rows 6 - 8) Repeat Row 2.
- Row 9) Repeat Row 5.
- Rows 10 - 12) Repeat Row 2.
- Row 13) Repeat Row 5.
- Rows 14 - 16) Repeat Row 2.
- Row 17) Repeat Row 5.
- Rows 18 - 20) Repeat Row 2.
- Row 21) Repeat Row 5.
- Rows 22 - 53) Repeat Row 2.
- Finish off. Weave in ends.
- Ch 68.
- Row 1: Hdc in 3rd ch from hk and in each st across. (66 hdc)
- Row 2: Ch 2, hdc in each st across. (66 hdc)
- Row 3 – 52: Repeat Row 2.
- Fasten off and leave a long tail (approx. 25 – 30″) to sew your front and back panels together. Weave in all ends except for the long tail. Sewing Panels and Adding a Zipper:
- Line up your front and back panels. You can use pins to keep them together, but this is optional. Thread your yarn needle with the long tail that you left.
- Begin whip stitching along the three sides of your pillow cover.
- The next step is to attach the zipper to the fourth side. Place the zipper between the front and back panels panels, making sure that it is centered on both sides (A). You will be sewing one side of the zipper to the front panel and the other side of the zipper to the back panel.
- Sewing the Zipper to the Front Panel: Using thread and a sewing needle, begin whip stitching across the zipper and front panel to sew them together; make sure that the needle moves through both the panel and the zipper.
- Tip: Try to sew the panel as close to the zipper opening as possible; this will ensure a seamless look.
- Sewing the Zipper to the Back Panel: Unzip the zipper before you begin to sew the back panel to the other side of the zipper. Using thread and a sewing needle, begin whip stitching across the zipper and back panel to sew them together; make sure that the needle moves through both the panel and the zipper.
Ch 68
Row 1) Hdc in 3rd ch from hk and in each st across. (66 hdc)
Bobble Pillow
Back Panel:
This is arguably the worst part of any crochet project, but when it comes to pillows, it’s exciting. You never know your pillow cover will turn out until you sew your sides together and pop in your insert.
To sew these panels together, we will be using a technique called the whip stitch. If you are unfamiliar with this stitch, there is a great tutorial by Wool and the Gang to help you here.
Sewing Method: