Cascades Pillow
by Esther Thompson @ Cute As A Button Crochet & Craft
https://www.caabcrochet.com/crochet-pillow-pattern-cascades/
https://www.caabcrochet.com/crochet-pillow-pattern-cascades/
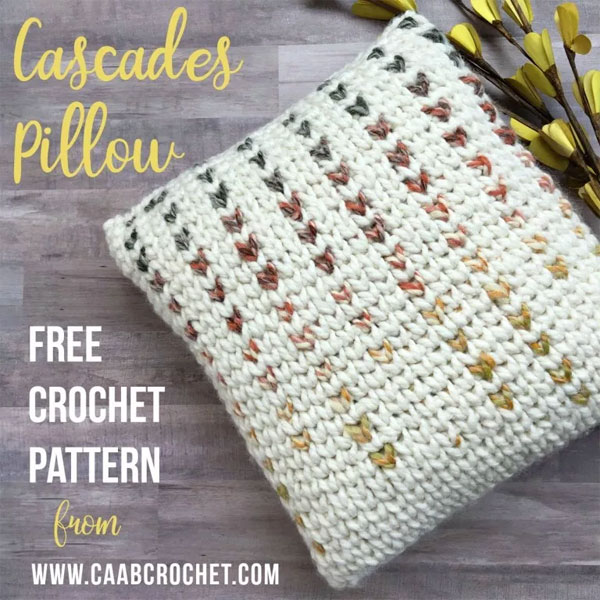
Cascades Pillow
Skill Level:
Finished Size: 14" Square (as written)
Gauge: 4 X 4 inch swatch of waistcoat stitches = 9 rows X 7 ½ stitches
Materials:
- 212 yards of size 6 yarn in a neutral color (I used Wool-Ease Thick & Quick in Fisherman)
44 yards of size 6 yarn in a variegated color (I used Wool-Ease Thick & Quick in Coney Island)
Planning for an 18" square: Approximately 290 yds color A, and 60 yds color B. Add 35% to all dimensions. - 14 inch pillow form
- Size P/ 11.5 mm crochet hook
- Yarn needle
- Scissors
Abbreviations, Notes and Tips:
- wst: waistcoat stitch (also sometimes called Center Post Single Crochet or Knit Stitch) Notes:
- This pattern is worked in rounds. You may find it helpful to use a stitch marker to mark the first stitch of each round.
- Waistcoat stitch in the round tends to lean a little to the left. One thing that can lessen this a little is to make sure the join for each row is very tight.
- When crocheting the waistcoat stitch, you need to take extra care to crochet loosely (especially if you are a tight crocheter like me). Loosen each stitch a little as you go so that it is easier to insert the hook on the next row. This may take a bit of practice if this is your first time using the stitch.
- If you are unable to achieve the same gauge, then you may choose to adjust the number of stitches per row. This means you may need to adjust the design on the front of the pillow.
- Chain 1 and first stitch of each round is always with Color A. Whenever you stitch with Color B, you will finish the stitch with Color A (see photo directions for "adding the v's" on page 4).
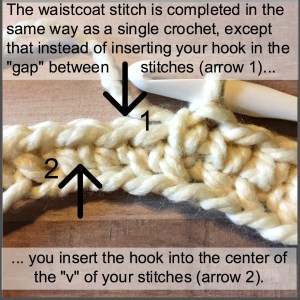
Waistcoat Stitch
Instructions:
- Foundation: Leaving a long tail, chain 48. To fit a 14 inch pillow snuggly, this chain should be about 24 inches long. Join with a sl st to form a circle.
- Round 1: Ch 1. Sc in the same stitch and around (loosely). Join with a sl st to the first sc. (48)
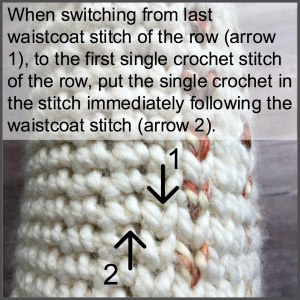
- Round 2: Ch 1. Wst into the first sc. Wst into the next 23 stitches. Sc into the next 24 stitches. Join with a sl st to the first wst of the round. (48).
- Round 3: Ch 1. Wst in the next 24 stitches. Sc in the next 24 stitches. Join with a sl st to the first wst of the round. (48) A note about sizing: This is a good point to go ahead and slip what you have so far around the pillow. If it has a nice fit (snug, like a gentle hug), then keep going. If it is baggy, or so tight that it scrunches up the pillow, then go back and adjust your gauge.
- Round 4: Ch 1. Wst in the first stitch. Wst in next stitch with color B (following the photo directions above). Wst in next 5 stitches with color A. Wst in next stitch with Color B. Wst in next 14 stitches with color A. Wst in next stitch with color B. Drop Color B and pick it up when needed in the next round (see photo below on dropping and picking up colors). Wst in next stitch with color A. Sc in next 24 stitches. Join with a sl st to the first wst of the round. (48)
- Round 5: Ch 1. Wst in the next 24 stitches. Sc in the next 24 stitches. Join with a sl st to the first wst of the round. (48) Tip: When doing a waistcoat stich over a row that contains "carried" yarn, it helps to be sure to insert the hook low enough in the "v" of the previous stitch to go under the string of carried yarn in the previous row. If you go too high, it is easier to accidentally catch on the carried yarn and then have the carried yarn color show through to the front of the work where you don't want it to. If this does happen, you can either do the stitch again more carefully, or you can find the carried yarn on the back of your work and give it a gentle tug to pull it back to the wrong side of your work.
- Round 6: Ch 1. Wst in the first stitch. Wst in the next stitch with color B. Wst in the next 5 stitches with Color A. Wst in the next stitch with Color B. Wst in the next 14 stitches with Color A. Wst in the next stitch with Color B. Drop Color B and pick it up when needed in the next round. Wst in next stitch with color A. Sc in next 24 stitches. Join with a sl st to the first wst of the round. (48)
- Round 7: Ch 1. Wst in the first 10 stitches. Wst in the next stitch with Color B. Wst in the next 13 stitches with Color A. Sc in next 24 stitches. Join with a sl st to the first wst of the round. (48)
- Round 8: Ch 1. Wst in the first stitch. Wst in the next stitch with color B. Wst in the next 5 stitches with Color A. Wst in the next stitch with Color B. Wst in the next 8 stitches with Color A. Wst in the next stitch with Color B. Wst in the next 5 stitches with Color A. Wst in next stitch with color B. Drop Color B and pick it up when needed in the next round. Wst in next stitch with color A. Sc in next 24 stitches. Join with a sl st to the first wst of the round. (48)
- Round 9: Ch 1. Wst in the first 10 stitches. Wst in the next stitch with Color B. Drop Color B and pick it up when needed in the next round. Wst in the next 13 stitches with Color A. Sc in next 24 stitches. Join with a sl st to the first wst of the round. (48)
- Round 10: Ch 1. Wst in the first stitch. Wst in the next stitch with color B. Wst in the next 5 stitches with Color A. Wst in the next stitch with Color B. Wst in the next 8 stitches with Color A. Wst in the next stitch with Color B. Wst in the next 5 stitches with Color A. Wst in next stitch with color B. Drop Color B and pick it up when needed in the next round. Wst in next stitch with color A. Sc in next 24 stitches. Join with a sl st to the first wst of the round. (48)
- Round 11: Ch 1. Wst in the first 4 stitches. Wst in the next stitch with Color B. Wst stitch in the next 5 stitches with Color A. Wst in the next stitch with Color B. Wst in the next 8 stitches with Color A. Wst in the next stitch with Color B. Drop Color B and pick it up when needed in the next round. Wst in the next 4 stitches with Color A. Sc in next 24 stitches. Join with a sl st to the first wst of the round. (48)
- Round 12: Ch 1. Wst in the first stitch. Wst in the next stitch with color B. Wst in the next 5 stitches with Color A. Wst in the next stitch with Color B. Wst in the next 8 stitches with Color A. Wst in the next stitch with Color B. Wst in the next 5 stitches with Color A. Wst in next stitch with color B. Drop Color B and pick it up when needed in the next round. Wst in next stitch with color A. Sc in next 24 stitches. Join with a sl st to the first wst of the round. (48)
- Round 13: Ch 1. Wst in the first 4 stitches. Wst in the next stitch with color B. Wst in the next 5 stitches with Color A. Wst in the next stitch with Color B. Wst in the next 2 stitches with Color A. Wst in the next stitch with Color B. Wst in the next 5 stitches with Color A. Wst in the next stitch with Color B. Drop Color B and pick it up when needed in the next round. Wst in the next 4 stitches with Color A. Sc in next 24 stitches. Join with a sl st to the first wst of the round. (48)
- Round 14: Ch 1. Wst in the first stitch. Wst in the next stitch with color B. Wst in the next 5 stitches with Color A. Wst in the next stitch with Color B. Wst in the next 8 stitches with Color A. Wst in the next stitch with Color B. Wst in the next 5 stitches with Color A. Wst in next stitch with color B. Drop Color B and pick it up when needed in the next round. Wst in next stitch with color A. Sc in next 24 stitches. Join with a sl st to the first wst of the round. (48)
- Round 15: Ch 1. Wst in the first 4 stitches. Wst in the next stitch with color B. Wst in the next 5 stitches with Color A. Wst in the next stitch with Color B. Wst in the next 2 stitches with Color A. Wst in the next stitch with Color B. Wst in the next 5 stitches with Color A. Wst in the next stitch with Color B. Drop Color B and pick it up when needed in the next round. Wst in the next 4 stitches with Color A. Sc in next 24 stitches. Join with a sl st to the first wst of the round. (48)
- Round 16: Ch 1. Wst in the first stitch. Wst in the next stitch with color B. Wst in the next 5 stitches with Color A. Wst in the next stitch with Color B. Wst in the next 8 stitches with Color A. Wst in the next stitch with Color B. Wst in the next 5 stitches with Color A. Wst in next stitch with color B. Drop Color B and pick it up when needed in the next round. Wst in next stitch with color A. Sc in next 24 stitches. Join with a sl st to the first wst of the round. (48)
- Round 17-30: Alternate rows 15 and 16 for the remainder of the pattern. I went to 30 rows. You can adjust this to more or less if needed to fit your pillow. When you complete your last row, leave a nice long tail when you finish off and don't weave it in. You will use this to sew up the top of the pillow.
Waistcoat Stitch
A note about adding columns of color B in the next step: You have 3 options for how you can add your columns of alternating color... 1) you can follow my text directions row by row below, 2) you can follow the chart at the bottom of this page for the front of the pillow, or 3) you can just wing it and put the colors where you like as you go.
If you are using option 2 and following the chart, then you will use the chart for the 24 waistcoat stitches on the front of the pillow (white being Color A and grey being Color B) and then complete the round with 24 single crochets for the back of the pillow, joining up to the first waistcoat stitch of the round with a slip stitch to finish the round. Each round starts with a ch 1 and then the waistcoat stitches for the front of the pillow.
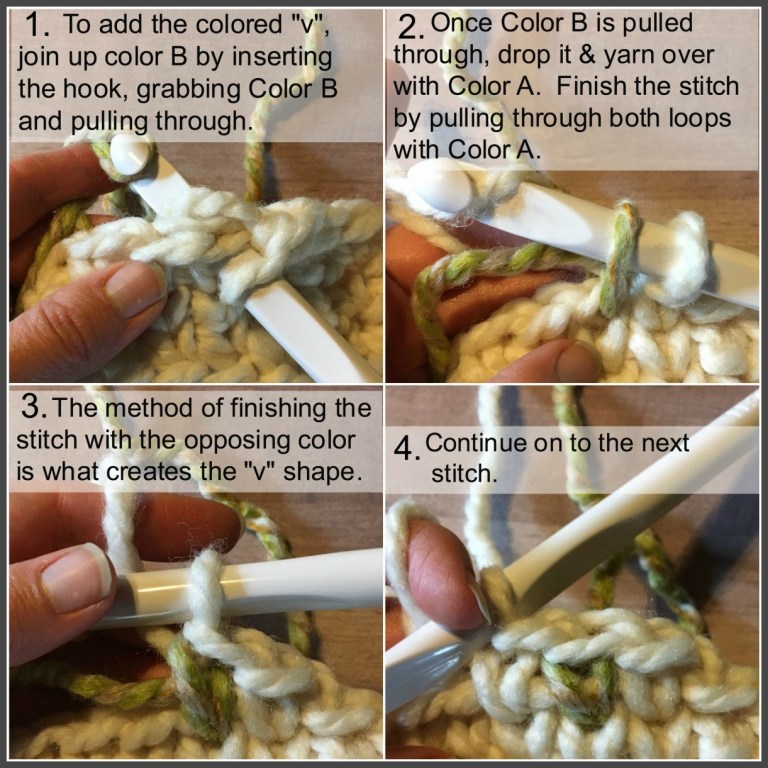
How to Add the "Vs" with Color B:
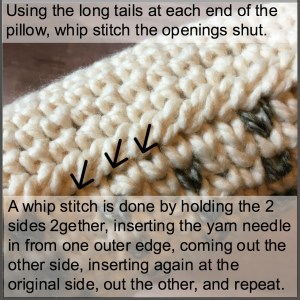
Using Long Tails
Using your long tail at the bottom of the pillow, whip stitch the lower edges together (I did this with right sides facing out and it looked fine). Weave in ends as needed throughout the pillow. Fit pillow form into the cover. Adjust as needed. Waistcoat stitches tend to drift a little to the left, so you may need to adjust a little to get everything straight. If you find you need to add or remove rows to create the best fit, do so now. When ready, with the pillow inserted in the cover, use the long tail at the top of the project to whip stitch the top edges together. Weave in end.
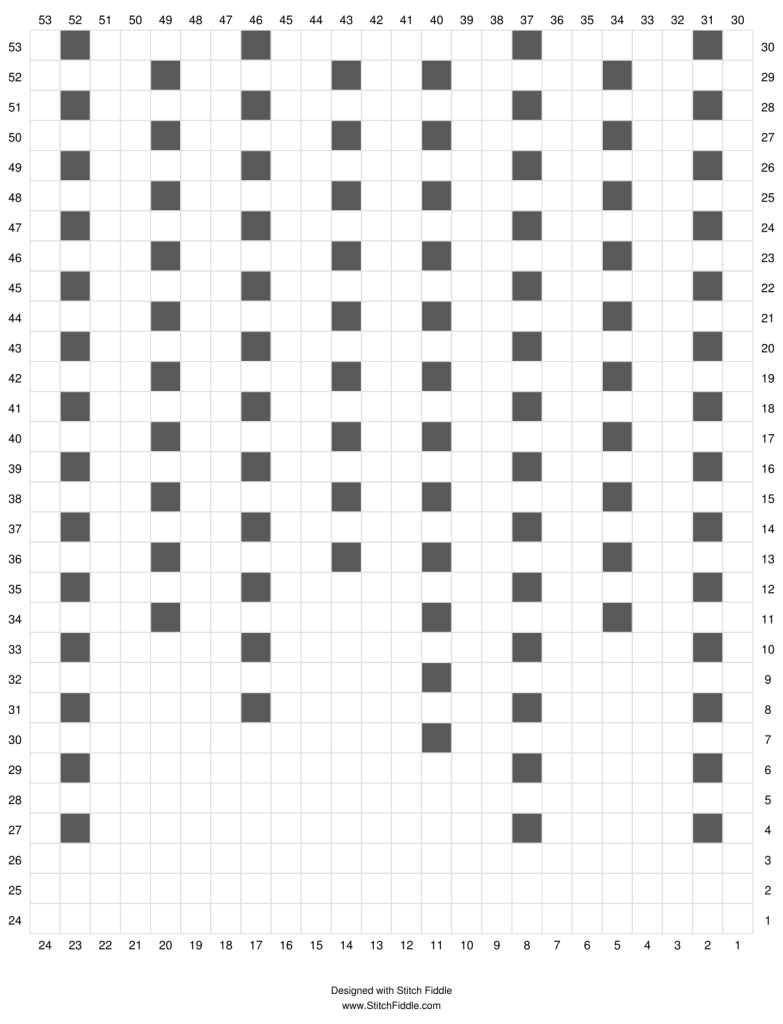
Design Chart showing location of color Vs