Retro Round Ripple Pillow
Retro Round Ripple Pillow
Skill Level:
Finished Size: abut 16" in diameter
Materials:
- About 8 oz any color worsted weight yarn
- 15 or 16 inch round pillow form
- 2 large Buttons or can lids
- Crochet hook 5.5 mm size I
- Needle
Abbreviations, Notes and Tips:
- Every round is joined.
- Every round is turned
- Every round is single crochet
- Every round is worked in the back loop only.
- This pillow itself is crocheted as a tube or sleeve, which is stretched over the pillow form, the ends gathered together, and buttons set, when finished.
- If you are using more than one color you should choose your color pattern before you start. I was halfway finished with this pillow when the yarn shortage necessitated a color change.
- Round 1 Ch 1, sc in the next 6 stitches; 3 sc in next st (create point);
sc in next 7 stitches; skip next 2 stitches (create valley),
*(sc in next 7 sts, 3 sc in next st, sc in next 7 sts, skip 2 stitches) work from (*) around join with slip stitch in first sc. Turn 10 points. - Round 2 Working in back loop only, sl st in the next 2 sc.
Ch 1, sc in same st, sc in next 6 stitches, 3 sc in next st (center st of point), sc in next 7 sts, sk next 2 sts (valley);
*( sc in next 7 sts, 3 sc in center of point, sc in next 7 stitches, sk next 2 sts.-) continue from, * around skip last 2 sts. Join. Turn
From here each row is worked the same way for a total of 32 rounds - Round 1 working through both loops 2 sc in each st around (16 sc)
- Round 2 (sc in next st, 2 sc in next sc) around (increase stitch), around (24 sc)
- Round 3 (sc in next 2 sts, 2 sc in next st,) around (32 sc)
- Round 4 (sc in next 3 sts. 2 sc in next st,) around (40 sc)
- Rounds 5 - 9 work even. Leave very long tail for . work even. Leave very long tail for sewing.
- Working even, sc around till piece is large enough to cover button front and wrap around enclosing the back. Weave yarn tail in and out of last row around for drawstring. Place a lemon size ball of fiberfill in center of wrong side and place the can lid on top of the fiberfill. Draw up string enclosing the lid. Check for how puffy the button face is. If you want it flatter or puffier remove or add fiberfill till it looks like you want it to be. Stitch back of button closed with the tail of the yarn coming out at center back for sewing later.
- To make the form, stack your fabric, wrong side out, right sides together and lay it out flat on the table. Pin or secure it so it will not slide and cut about a 20-inch in diameter circle from this fabric. I used a pencil to trace my pattern around the outside of a 20-inch in diameter lampshade. It does not have to be exactly 20 inches but your pillow form casing must be several inches larger than the finished pillow to allow for the depth to make a fat pillow. Trust me on this one. You could use a similar size round object such as a salad bowl, the bottom of a small clothes basket, your Child's school compass or a pencil and a string or you could draw it freehand. (You-Tube actually has video on how to create a circle without a compass) If you are unsure try your circle pattern on a sheet of newspaper before you cut your fabric. When you get one that looks good use it for your pattern. Remember it does not have to be 100% exactly perfectly round as long as it is reasonably round or as my 6-year-old grandniece would say "Grown-up round."
- After cutting sew around the edge with a 5/8 of an inch seam allowance remembering to leave about 5 inches open for stuffing. If you do not have access to a sewing machine, you can hand stitch it. You don't have to make teensy, tiny stitches, just sort of small and close enough together to keep the stuffing inside. Turn the pillow casing right side out and fold it in quarters so you can make reference points by marking the center, (at the point,) on the front and the back side of the pillow. You will need these reference points later for placing the buttons. Stuff the casing with about 3/4 of the bag of fiberfill, you want it nice and plump but save a couple of handfuls for the buttons. Stitch the opening closed. NOTE:
- To finish the Pillow:
Thread straight upholstery needle or long craft needle with the yarn tail on the back of the button. If you cut it off, just run another strand under the stitches and let the ends hang out like a shoelace, then thread both strands into the needle. With pillow sleeve right side out, insert needle through center of sleeve and into the reference point you marked on the center of the pillow casing, pushing all the way through so it emerges through the reference point on the other side. You may need to wiggle it around a bit to hit the center. Pull the yarn through tightly but don't tie it off yet. Pull pillow sleeve up around pillow form but do not close it. Thread the needle with yarn tail from the second button and push through the pillow to the other side emerging under the center of opposite button. Letting the buttons hang loosely (the idea is to get them in the proper place before finishing) Use a double strand of yarn to draw the points of the pillow sleeve together, making sure both the button and the yarn tail from the opposite button are hanging outside the pillow sleeve open end, before you draw it closed. Tie it tightly, work in the end. You should now have a covered pillow with a yarn tail and a button hanging off each side. Pull the yarn tails from the buttons tightly to cinch up center of the pillow. Wrapping the yarn tails around under the bottom of the buttons and tie tightly several times. Repeat with the opposite button. Wind the yarn tail around the bottom of the button and the bury the end into the fiberfill.
To change colors: join yarn in the 7th stitch before the center stitch of any point.
This pattern has 32 rounds. Round # 16 is the half way point.
For a reversible pillow you would change to your second color on round # 17.
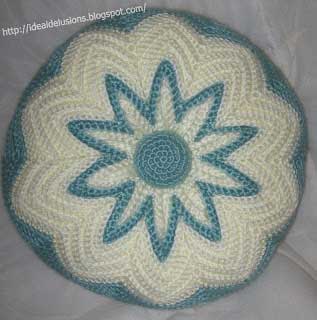
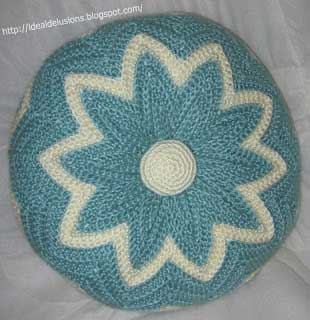
Different color scheme
For stripes this is where you would reverse your colors sequence to make each side the same or you could continue with the same sequence to make a negative of the first side.
For stash busters you can also just let the colors work themselves out.
Don�t worry if it does not look wide enough this is normal. This process creates a tube or sleeve and although it looks narrow it will flatten out to the correct width.
When you finish the 32nd round, work 1 slip stitch in the center of each point to draw the end closed. End off and work in all ends.
How to make your Buttons (make 2)
Change to smaller hook if a tighter stitch is desired
Back in the old days we used canning jar lids. You can still purchase canning jar lids in packages near canning supplies in grocery stores and Wal-Mart however now there are 2 sizes. If you opt to purchase canning jar lids the smaller size is what you need, Not the new wide mouth jar size.
But if you have the type can opener that cuts along the outside rim of the lid, not on the inside and leaves NO sharp edges, you can wash, save and use two can lids. On my pillow I used 2 Campbell's Soup can lids. (not the pop top kind) which are about the same size as a canning jar lid. Also you could use two very large "Shank" style buttons.
It is best to start with a slip loop so you can completely close the center hole.
8 sc in loop, do not join, place marker, work in spiral fashion
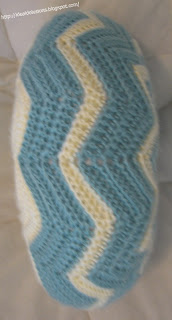
Side View
For those of you with an adventuresome spirit: I have stuffed the crocheted pillow sleeve without a lining and I do not recommend that. It gets nasty the first time it is washed and since it is crocheted in one piece, it has no side seams, so it does not does not hold its shape. I already made that mistake and what a mess that was.