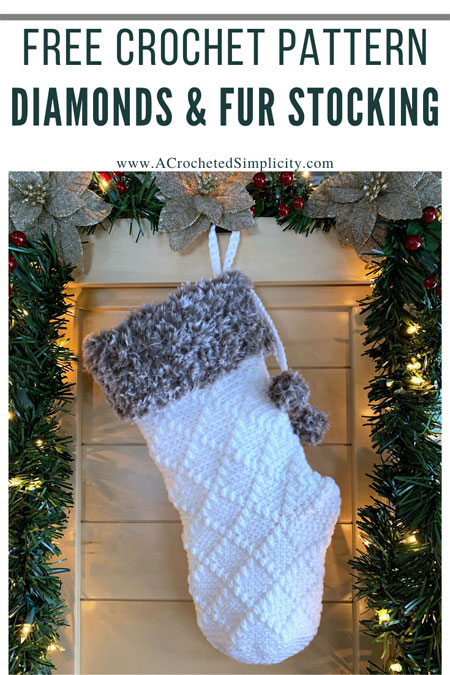
Diamonds and Fur Stocking
by Jennifer Pionk Middleton
https://www.acrochetedsimplicity.com/diamonds-fur-christmas-stocking-free-crochet-pattern/
Diamonds and Fur Stocking
Skill Level:
Finished Size: 6.5" X 17"
Gauge:
Materials:
- Yarn: Worsted Weight / 4 yarn & Super Bulky Weight / 6 yarn / I used Lion Brand Yarns Vanna’s Choice in White and Go For Faux in Bear for my stocking. This yarn is available from Lion Brand Yarns directly here or you can also find it on Amazon here.
Worsted Weight Yarn – White (260 yards)
Faux Fur Yarn – Bear (28 yards) - Crochet Hooks: I/9/5.50mm & 9.00mm; or size needed to obtain gauge (My favorite crochet hooks are the Clover Amour Crochet Hooks, I’ve never had an ache in my hand since switching).
- Scissors
- Yarn Needle
- Locking Stitch Marker
- Scrap piece of yarn
Abbreviations, Notes and Tips:
- Beginning chain(s) are not included in stitch count, unless noted otherwise.
- First stitch of each row is worked in the same stitch as the turning chain, unless otherwise specified.
- I tend to crochet on the tighter side. You may find yourself needing to go down a hook size (or two) to properly meet gauge, but gauge isn’t as critical with this design.
- This stocking it worked from the top down to the toe. A faux fur cuff is then made and sewn on. Faux fur poms are then added, if desired.
- NO FAUX FUR CUFF OPTION: If you do not want a faux fur cuff on your stocking, simply crochet the Cuff & Cuff Seam from the Buffalo Plaid Christmas Stocking here, then whipstitch it to the top of your Diamonds & (No) Fur Stocking.
- LEG OF STOCKING
- Rnd 1 (RS): Ch 1, working into the back hump of the ch, sc in each ch around. Do not join. (48 sts) Begin using a stitch marker or scrap piece of yarn to keep track of the beginning of each round as you work.
- Rnds 2 – 5: Sc in each st around.
- Rnds 6 – 7: BLO sc in each st around. Do not fasten off. Continue on to Diamonds Design.
- Rnd 1: (BLO sc in each of the next 4 sts, FLO dc in the next st 2 rnds below, BLO sc in each of the next 3 sts) rep from ( to ) around. (48 sts)
- Rnd 2: (BLO sc in each of the next 3 sts, FLO dc in the next st 2 rnds below, BLO sc in the next st, FLO dc in the next st 2 rnds below, BLO sc in each of the next 2 sts ) rep from ( to ) around.
- Rnd 3: (BLO sc in each of the next 2 sts, FLO dc in the next st 2 rnds below, BLO sc in each of the next 3 sts, FLO dc in the next st 2 rnds below, BLO sc in the next st) rep from ( to ) around.
- Rnd 4: (BLO sc in the next st, FLO dc in the next st 2 rnds below, BLO sc in each of the next 5 sts, FLO dc in the next st 2 rnds below ) rep from ( to ) around.
- Rnd 5: (FLO dc in the next st 2 rnds below, BLO sc in each of the next 7 sts) rep from ( to ) around.
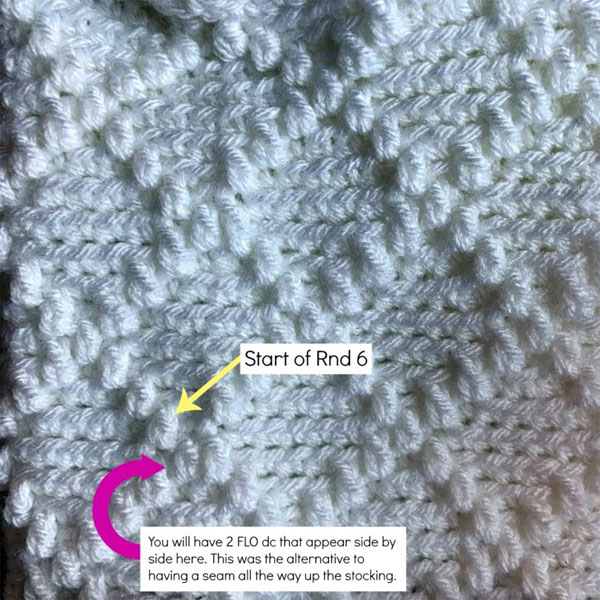
- Rnd 6: Rep Rnd 4. *Note: Some FLO dc will be worked into the FLO of other dc 2 rnds below.
- Rnd 7: Repeat Round 3.
- Rnd 8: Rep Rnd 2.
- Rnd 9: (BLO sc in each of the next 4 sts, FLO dc in the next st 2 rnds below, BLO sc in each of the next 3 sts) rep from ( to ) around.
- Rnds 10 – 28: Rep Rnds 2 – 9, ending with a Rnd 4. At the end of round 28, place a stitch marker in stitch #42 to mark the beginning of the heel. Fasten off. Weave in ends. Approximate length at this point is 10″. Continue on to Heel.
- Row 1 (RS): Using a 5.5 mm crochet hook and white yarn, begin by leaving an 8″ tail of yarn to sew gap closed in the next section, then join yarn with a standing sc in the st marked with a stitch marker, sc in each of the next 14 sts. Turn. (15 sts)
- Row 2: Ch 1, sc in next 10 sts. Turn. (10 sts)
- Row 3: Ch 1, sc in next 5 sts. Turn. (5 sts)
- Row 4: Ch 1, sc in next 5 sts, sc in next st of Row 1. Turn. (6 sts)
- Row 5: Ch 1, sc in next 6 sts, sc in next st of Row 2. Turn. (7 sts)
- Row 6: Ch 1, sc in next 7 sts, sc in next st of Row 1. Turn. (8 sts)
- Row 7: Ch 1, sc in next 8 sts, sc in next st of Row 2. Turn. (9 sts)
- Row 8: Ch 1, sc in next 9 sts, sc in next st of Row 1. Turn. (10 sts)
- Row 9: Ch 1, sc in next 10 sts, sc in next st of Row 2. Turn. (11 sts)
- Row 10: Ch 1, sc in next 11 sts, sc in next st of Row 1. Turn. (12 sts)
- Row 11: Ch 1, sc in next 12 sts, sc in next st of Row 2. Turn. (13 sts)
- Row 12: Ch 1, sc in next 13 sts, sc in next st of Row 1. Turn. (14 sts)
- Row 13: Ch 1, Both Loops sc in each of the next 7 sts, BLO sc in the next st, Both Loops sc in each of the next 6 sts, Both Loops sc in the next st of Row 2. Do not turn. (15 sts)
Place a stitch marker in the FLO of st #8 to mark the beginning of the Foot of Stocking.
Fasten off leaving an 8″ tail of yarn to sew gap closed in the next section. Continue on to Foot of Stocking. - Rnd 1 (RS): Using a 5.5 mm crochet hook & white yarn, join yarn with a standing dc in the FLO of the stitch marked with a stitch marker, BLO sc in each of the next 7 sts, (FLO dc in the next st 2 rnds below, BLO sc in each of the next 7 sts) rep from ( to ) around. (48 sts)
- Rnds 2 – 5: Rep Diamonds Design Rnds 6 – 9.
- Rnds 6 – 17: Rep Diamonds Design Rnds 2 – 9, ending with a Rnd 5 Rep.
- Rnd 18: BLO sc in each st around. Do not fasten off. Continue on to Toe. Approximate length from last row of heel is 5″.
- Rnd 1: Both Loops, sc in each st around. (48 sts)
- Rnd 2: * sc in each of the next 5 sts, invsc2tog, rep from * around to the last 6 sts, sc in each of the last 6 sts. (42 sts)
- Rnd 3: * sc in each of the next 5 sts, invsc2tog, rep from * around. (36 sts)
- Rnd 4: * sc in each of the next 4 sts, invsc2tog, rep from * around. (30 sts)
- Rnd 5: * sc in each of the next 4 sts, invsc2tog, rep from * around. (25 sts)
- Rnd 6: * sc in each of the next 3 sts, invsc2tog, rep from * around. (20 sts)
- Rnd 7: * sc in each of the next 3 sts, invsc2tog, rep from * around. (16 sts)
- Rnd 8: * sc in each of the next 2 sts, invsc2tog, rep from * around. (12 sts)
- Rnd 9: Invsc2tog around. (6 sts) Fasten off leaving a tail of yarn and use a yarn needle to sew the toe closed. Weave in ends. Continue on to Faux Fur Cuff.
- Row 1: Using a 9.00 mm crochet hook & faux fur yarn, ch 8, working into the back humps of the ch, sc in the 2nd ch from your hook and in each ch across. Turn. (7 sts)
- Row 2: Ch 1, sc in each st across. Turn. Rep Row 2 until the cuff measures 15.5″ L (or long enough to wrap around the top edge of your stocking). Fasten off leaving a 10″ tail of yarn for seaming the short edges of the cuff. Using a yarn needle and tail of yarn, whipstitch the short edges of your cuff together. Weave in ends. Continue on to Attaching the Cuff. Approximately size: 3.75″ W x 15.5″ L. ATTACHING THE CUFF
- Step 1: Slide the cuff over the top edge of the stocking. Line up the top edge of the stocking with the top edge of the cuff. Use a locking stitch marker or two to hold the two edges together while you seam them.
- Step 2: Using a yarn needle and 30″ piece of white, worsted weight yarn, whipstitch the top edge of the cuff and top of edge of the stocking together. Make sure that when you insert the yarn needle through the faux fur cuff, that you insert it under a top loop instead of just under the fur. Whipstitch through every other stitch around the top edge of the stocking, but through nearly every stitch of the faux fur cuff. Weave in ends. Continue on to Hanging Loop.
- Using a 5.50 mm crochet hook and white yarn, ch 31, working into the back hump of the ch, sc in the 2nd ch from your hook and in each ch across. (30 sts)
- Fasten off leaving an 8” tail. Using a yarn needle and the tail of yarn, fold your work in half and sew the loop onto the inside of the stocking at the center back of the leg. Weave in ends. Continue on to Faux Fur Poms & Tie, if desired. FAUX FUR POMS (MAKE 2)
- Rnd 1: With a 9.00 mm crochet hook and faux fur yarn, ch 2, work 4 sc into the 2nd ch from your hook. Do not join. (4 sts) Use a scrap piece of yarn to keep track of the beginning of each round as you work.
- Rnd 2: Work 2 sc into each st around. (8 sts)
- Rnd 3: (sc2tog) 4 times. (4 sts) Fasten off. Continue on to Tie.
Note: This section is worked in continuous rounds (a spiral). Do not join at the end of each round, instead use a scrap piece of yarn to keep track of the beginning of each round. Move the scrap of yarn up as you complete each round.
Gauge: In BLO sc, 10 sts = 3″; 9 rows = 3″
Set-up: With a 5.50 mm crochet hook and white yarn, ch 48, being careful not to twist the chain, join with a sl st to the 1st ch.
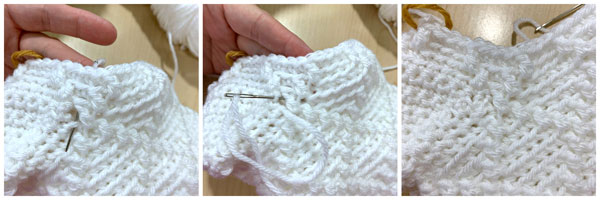
*SEE THE CHART BELOW FOR A VISUAL OF THE DIAMONDS DESIGN.*
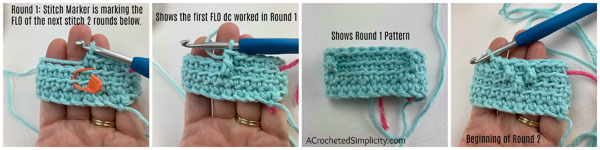
Illustration of stitches in diamond pattern
diamond pattern
HEEL
Note: Stitches are worked under both loops. Heel is worked in rows.
FOOT OF STOCKING
Note: This section is worked in back loops only.
Note: This section is worked in continuous rounds (a spiral). Do not join at the end of each round, instead use a scrap piece of yarn to keep track of the beginning of each round. Move the scrap of yarn up as you complete each round.
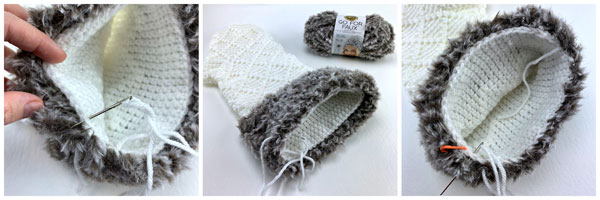
Tip! After working a couple rounds in the Foot of Stocking, use a yarn needle and tails of yarn to stitch closed the small gaps near the first and last stitches of the heel. It’s easier to do this now, rather than waiting until you’ve completed your stocking.
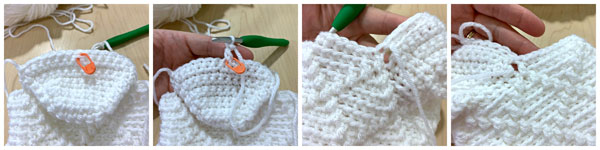
closing heel and transition to foot
closing heel
** FOR THE REMAINDER OF THE FOOT OF STOCKING, YOU’RE GOING TO REPEAT ROUNDS FROM THE DIAMONDS DESIGN SECTION ABOVE. **
TOE
Note: This section is worked in continuous rounds (a spiral). Do not join at the end of each round, instead use a scrap piece of yarn to keep track of the beginning of each round. Move the scrap of yarn up as you complete each round.
FAUX FUR CUFF
Note: The cuff is worked flat, in rows, seamed, then attached to the top of the stocking.
Gauge: Using super bulky fur yarn, in sc: 7 sts = 3.75″
Attaching Cuff
HANGING LOOP
TIE
With a 5.50 mm crochet hook and white yarn, begin by leaving an 8″ tail of yarn to tie a pom onto, ch until your ch measures 11″. Do not fasten off. Place a stitch marker into the last chain to hold it so you can adjust the length later, if needed.
Using a yarn needle and beginning tail of yarn, weave the tie through a stitch at the top, center back of leg of your stocking.
Tie 1 pom onto the end of the tie without the stitch marker. Knot to secure and weave ends into the inside of the pom.
Move the tie around to adjust it to the length you prefer. Remove chains if it’s too long, add chains if it’s too short. Once you’ve decided on the proper length, fasten off leaving a 4″ tail.
Tie 2nd pom onto the opposite end of the tie. Knot to secure and weave ends into the inside of the pom.
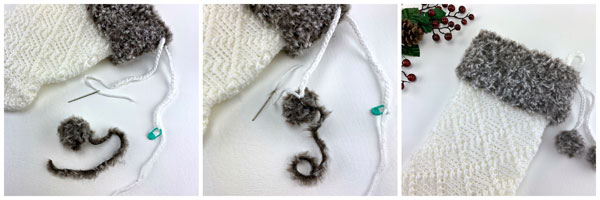
Attaching Pompoms
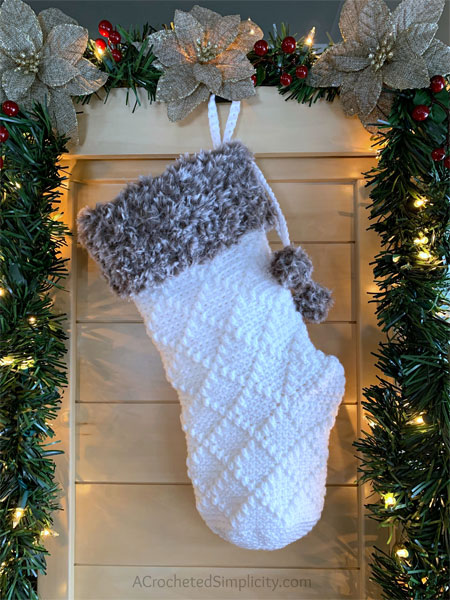
Finished Project