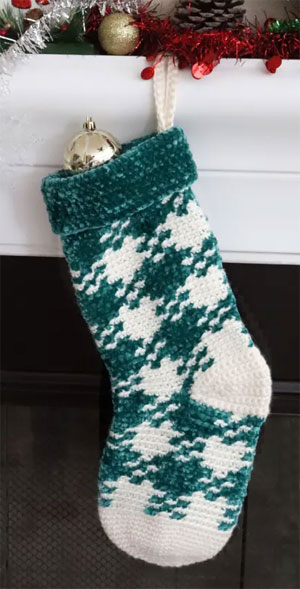
Gingham Christmas Stocking
by Jennifer Middleton
https://divinedebris.com/gingham-stocking-crochet-pattern/
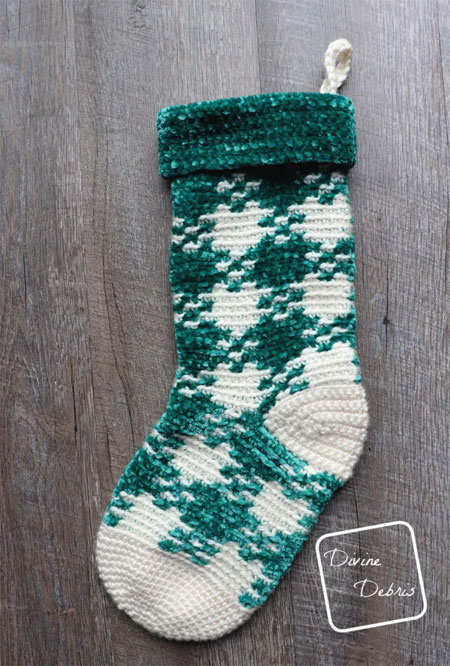
Gingham Christmas Stocking
Skill Level:
Finished Size: 6" across x 18" high
Gauge:17 sc x 13 rows BLO = 4"
Materials:
- US H (5.00 mm) crochet hook
- Size #5 Bulky Weight yarn, 2 colors
I used Red Heart Essentials (3.3 oz/ 87 yds) and Bernat Velvet (4.9 oz/ 147 yds) - Needle that will weave in your ends
- Notions: scissors, measuring tape
Abbreviations, Notes and Tips:
- This pattern is worked in one piece from the toe up. It will be worked in sections: Toe, Arch, Heel, Ankle, Cuff, and Loop. The Toe, Arch, Ankle, and Cuff are worked in the round with a slip st into the first st of the rnd. The Heel is worked back and forth in rows and then seamed.
- The ch 1 at the beginning of the row does not count as a stitch.
- Every stitch in Arch and the Ankle sections is a single crochet. The directions will only tell you what color (ie: Color A, Color B, etc…) and the number in the parentheses tells you how many scs to make.
- In the example, the inactive yarn is carried behind the active. If this is confusing, you might want to check out the helpful Moogly video on tapestry.
- Color A is cream (Red Heart Yarns Soft Essentials in Cream) 3.3 oz/ 87 yds and color B is teal (Bernat Velvet in Pagoda) 4.9 oz/ 147 yds.
Gingham Christmas Stocking
Instructions:
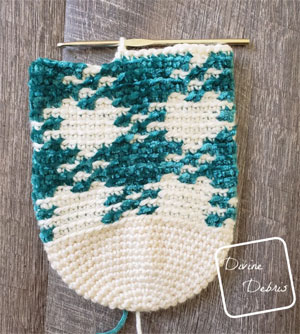
- Toe
- Rnd 1: A: Create a magic circle, ch 1, sc 6 times into the circle, join – 6 sc
- Rnd 2: Ch 1, sc twice into the same st as join, *sc twice into the next st,* repeat from * to * 4 more times, join – 12 sc
- Rnd 3: Ch 1, sc twice into the same st as join, sc into the next st, *sc twice into the next st, sc into the next st,* repeat from * to * 4 more times, join – 18 sc
- Rnd 4: Ch 1, sc twice into the same st as join, sc into the next 2 sts, *sc twice into the next st, sc into the next 2 sts,* repeat from * to * 4 more times, join – 24 sc
- Rnd 5: Ch 1, sc twice into the same st as join, sc into the next 3 sts, *sc twice into the next st, sc into the next 3 sts,* repeat from * to * 4 more times, join – 30 sc
- Rnd 6: Ch 1, sc twice into the same st as join, sc into the next 4 sts, *sc twice into the next st, sc into the next 3 sts,* repeat from * to * 4 more times, join – 36 sc
- Rnd 7: Ch 1, sc twice into the same st as join, sc into the next 5 sts, *sc twice into the next st, sc into the next 5 sts,* repeat from * to * 4 more times, join – 42 sc
- Rnd 8: Ch 1, sc twice into the same st as join, sc into the next 6 sts, *sc twice into the next st, sc into the next 6 sts,* repeat from * to * 4 more times, join – 48 sc
- Rnds 9 – 14: Ch 1, sc into the same st as join and into the next 47 sts, join – 48 sc Arch
- The following directions will only tell you what color (ie: Color A, Color B, etc…) and the number in the parentheses tells you how many stitches to make.
- The rnds 15 – 30 are worked into the BLO. Slip st into both loops on the join to help keep your seam straight.The first st is always worked into the same st as the join.
- Rnd 15: A: Ch 1, *(6), B: (2), A: (2), B: (2),* repeat from * to * 3 more times, join – 48 sc
- Rnd 16: A: Ch 1, (8), B: (2), *A: (10), B: (2),* repeat from * to * twice more, A: (2), join – 48 sc
- Rnds 17 – 18: repeat rnds 15 – 16, once.
- Rnd 19: A: Ch 1, *(2), B: (2), A: (2), B: (6),* repeat from * to * 3 more times, join – 48 sc
- Rnd 20: B: Ch 1, (2), A: (2),* B: (10), A: (2),* repeat from * to * twice more, B: (8), join – 48 sc
- Rnds 21 – 22: repeat rnds 19 – 20, once.
- Rnds 23 – 30: repeat rnds 15 – 20, once. Do not fasten off. Color A will be used in the Heel and color B can be dropped temporarily.
- The Heel has its own row count.
- This section is worked in piece and folded in half, with the row ends being secured to create the Heel.
- Row 1: A: Ch 1, sc into the BLO of the next 24 sts – 24 sc
- Row 2: Ch 1, turn, sc2tog the first 2 sts, sc into the next 20 sts, sc2tog the last 2 sts – 22 sc
- Row 3: Ch 1, turn, sc2tog the first 2 sts, sc into the next 18 sts, sc2tog the last 2 sts – 20 sc
- Row 4: Ch 1, turn, sc2tog the first 2 sts, sc into the next 16 sts, sc2tog the last 2 sts – 18 sc
- Row 5: Ch 1, turn, sc2tog the first 2 sts, sc into the next 14 sts, sc2tog the last 2 sts – 16 sc
- Row 6: Ch 1, turn, sc2tog the first 2 sts, sc into the next 12 sts, sc2tog the last 2 sts – 14 sc
- Row 7: Ch 1, turn, sc2tog the first 2 sts, sc into the next 10 sts, sc2tog the last 2 sts – 12 sc
- Row 8: Ch 1, turn, sc2tog the first 2 sts, sc into the next 8 sts, sc2tog the last 2 sts – 10 sc
- Row 9: Ch 1, turn, sc twice into the first st, sc into the next 8 sts, sc twice into the last st – 12 sc
- Row 10: Ch 1, turn, sc twice into the first st, sc into the next 10 sts, sc twice into the last st – 14 sc
- Row 11: Ch 1, turn, sc twice into the first st, sc into the next 12 sts, sc twice into the last st – 16 sc
- Row 12: Ch 1, turn, sc twice into the first st, sc into the next 14 sts, sc twice into the last st – 18 sc
- Row 13: Ch 1, turn, sc twice into the first st, sc into the next 16 sts, sc twice into the last st – 20 sc
- Row 14: Ch 1, turn, sc twice into the first st, sc into the next 18 sts, sc twice into the last st – 22 sc
- Row 15: Ch 1, turn, sc twice into the first st, sc into the next 20 sts, sc twice into the last st – 24 sc Fasten off.
- The following directions will only tell you what color (ie: Color A, Color B, etc…) and the number in the parentheses tells you how many stitches to make.
- The rnds 15 – 30 are worked into the BLO. Slip st into both loops on the join to help keep your seam straight.The first st is always worked into the same st as the join.
- For rnd 31 you will work into the BLO for the 24 sts of the Heel and then into the 24 sts of the Arch before joining at the end of the rnd.
- Rnd 31: A: Ch 1, *(6), B: (2), A: (2), B: (2),* repeat from * to * 3 more times, join – 48 sc
- Rnd 32: A: Ch 1, (8), B: (2), *A: (10), B: (2),* repeat from * to * twice more, A: (2), join – 48 sc
- Rnds 33 – 34: repeat rnds 31 – 32, once.
- Rnd 35: A: Ch 1, *(2), B: (2), A: (2), B: (6),* repeat from * to * 3 more times, join – 48 sc
- Rnd 36: B: Ch 1, (2), A: (2),* B: (10), A: (2),* repeat from * to * twice more, B: (8), join – 48 sc
- Rnds 37 – 38: repeat rnds 35 – 36, once.
- Rnds 39 – 54: repeat rnds 31 – 38, twice. Fasten off color A.
- The following directions rnds feature a turn at the beginning of the rnd. This is for added texture.
- The Cuff is made tall and then you fold it over itself down toward the Toe.
- Rnd 55: B: Ch 1, sc into the same st as join and into the next 47 sts, join – 48 sc
- Rnds 56 – 73: Ch 1, turn, sc into the next 48 sts, join – 48 sc Fasten off, weave in your ends.
- Note:
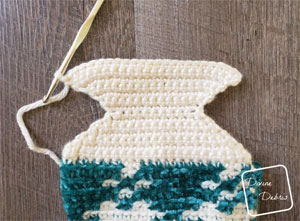
Heel
Heel
- Note:
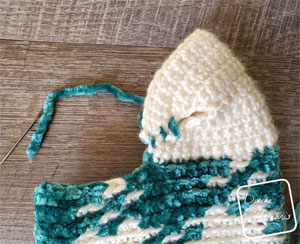
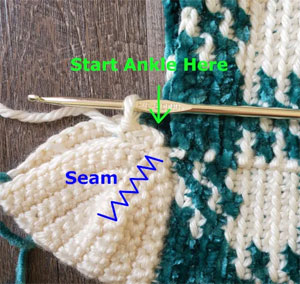
Seaming
Seaming
Fold your Heel in half along Row 8, lining up Rows 1 – 7 with Rows 9 – 15 (7 rows) and seam the row ends together in your preferred method of seaming. Repeat on the other side of the Heel.
Fasten off, weave in your ends.
Seaming
Ankle
- Note:
Finished!
Cuff
- Note: