Winter Opulence
Granny Square Pattern
by Kirsten Holloway
https://kirstenhollowaydesigns.com/2018/11/winter-opulence-crochet-granny-square-pattern.html
https://kirstenhollowaydesigns.com/2018/11/winter-opulence-crochet-granny-square-pattern.html
See this page link above for additional beautiful designs linked at the bottom of the page.
Winter Opulence
Granny Square Pattern
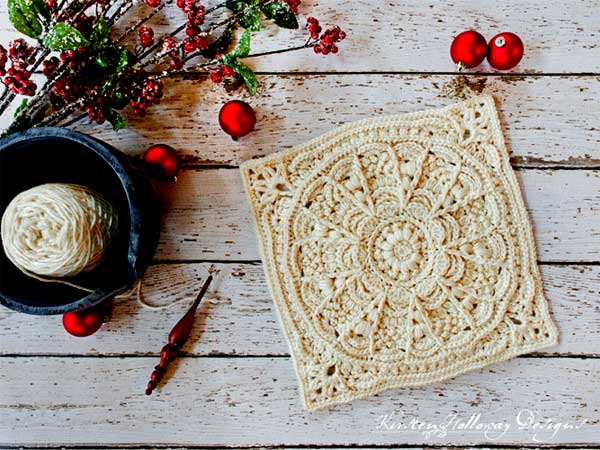
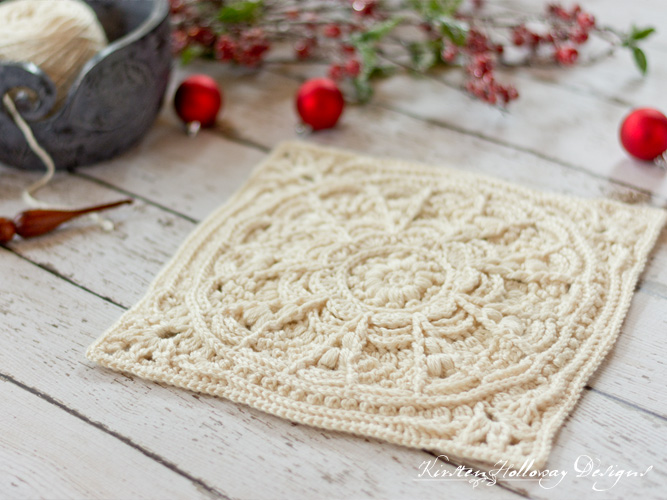
This beautiful crochet granny square pattern creates a thick, sturdy block, which will make such a warm addition to your next blanket or afghan. It is so bursting with texture. However, no two rounds are the same. So, this is a challenging, yet fun square to crochet.
This granny square pattern was designed for the Creative Crossings Sampler Blanket to begin with. However, it would also make a stunning blanket by itself. Because it's so textured, it looks amazing either in one single color, or in several different ones.
I used Red Heart Soft yarn because it has a nice drape, and feels amazing! You may substitute other worsted weight yarns, but you may not end up with the same effect.
Skill Level: Intermediate/Advanced
Finished Size: 12" X 12" (blocked)
About 11½" across center before blocking — and 52stitches + 2 chains per side
Gauge: My circle measured a little over 3 1/4" across after round 6.
Materials:
- 5 mm hook (G)
- 250-275 yards #4 worsted weight Red Heart "Soft" in Off-white
- Yarn needle
- Scissors
Abbreviations, Notes and Tips:
- ch = chain
- sl st = slip stitch
- sc = single crochet
- hdc = half double crochet
- dc = double crochet
- tr = treble crochet
- BPsc = back post single crochet
- BPhdc = back post half double crochet
- BPdc = back post double crochet
- FPsc = front post single crochet
- FPdc = front post double crochet
- FPtr = front post treble crochet
- BLO = back loop only
- sp(s) = space(s)
- Picot sc = Insert hook, yo, pull up a loop, [yo, draw through 1 loop] 3 times to make a ch 3, then yo, and draw through last loop on the hook.
- 3-dc cluster = dc3tog in same stitch
- Small puff st = yo, pull up a loop 3 times in same st, yo, pull through 6 loops, yo, pull through final 2 loops
- Puff st = yo, pull up a loop 4 times in same st, yo, pull through 8 loops, yo, pull through final 2 loops
This square will not always lay flat as you are working it, although it does flatten out in the end and a bit of light blocking should fix any wobbly edges. The square pictured has not been blocked.
This is an intermediate/Advanced level square, but the texture repeats should be fairly intuitive after you complete the first repeat section of a round. Take it one comma at a time if you get stuck.
Instructions:
- 6 sc in magic circle, join with sl st to first sc. (6 sc)
- ch 1, working in BLO, 2 sc in each st around, join with sl st to first st. (12 sc)
- ch 1, *small puff st, ch 1, move to next st; repeat from * around, join with sl st to first small puff. (12 small puffs, 12 ch)
- ch 1, picot sc in first st, sc in next st * picot sc in next st, sc in next st; repeat from * around, join with sl st to first picot sc. (12 picot sc, 12 sc)
- ch 1, sc in first st, 2 sc in next st *sc in next st, 2 sc in next st; repeat from * around, join with sl st to first sc (36 sc)
- ch 1, BPsc around each sc st in round, join with sl st to first BPsc (36 BPsc) Your project will probably cup a little at this point, just hang in there. It's going to get worse before it gets better.
- Sk join st, *sk next st, 5 dc in next st, sk st, sl st in next st; repeat from * around. Final sl st counts as join (9 5-dc shells)
- working along back side, ch 5, sl st around BPsc between petals (this is just the closest BPsc to where you placed your sl st. You''ll be working into the actual sl sts in a few rounds. Final sl st counts as join. (9 ch-5 sp, 9 sl st)
- *sl st into ch-5 sp, (hdc, 2 dc, 3 tr, 2 dc, hdc, sl st) in ch-5 sp; repeat from * around. Final sl st counts as join. (9 petals)
- ch 1, *BPdc around next 3 sts, BPhdc around next 3 tr, BPdc around next 3 sts, sk 2 sl sts; repeat from * along each petal. Join with sl st to first BPdc. (54 Bpdc, 27 BPhdc)
- ch 1, FPtr in sl st between first petals from round 7, *sk st, BPhdc around next 7 sts, sk st, (FPtr, ch 1, FPtr) in Round 7 sl st between next 2 petals; repeat from * around omitting final FPtr. Join with sl st to first FPtr. (9 7-st petals, 18 FPtr, 9 ch-1 sps) Your project should start laying flat after this round.
- ch 1, FPdc around FPtr, *ch 1, sk 2 sts, [3dc cluster in next st, ch 1] 3 times, sk 2 sts, FPdc around FPtr, ch 1, puff st in ch-1 sp, ch 1, FPdc around next FPtr; repeat from * around omitting final FPdc. Join with sl st to first FPdc. (18 FPdc, 9 puff sts, 27 3-dc clusters)
- ch 1, *FPdc around FPdc, [sc in ch-1 sp, picot sc in top of 3 dc cluster] 3 times, sc in ch-1 sp, FPdc around FPdc, sk st (puff st, ch 1, puff st) in top of puff st from previous round, sk st; repeat from * around, join with sl st to first FPdc. (18 FPdc, 36 sc, 27 picot sc, 18 puff sts)
- ch 1, *FPsc around FPdc, [picot sc in next st, sc in next st] 3 times, picot sc in next st, FPsc around FPdc, sk to ch-1 sp between puff sts from previous round, 7 hdc in ch-1 sp; repeat from * around, join with sl st to first FPsc. (18 FPsc, 36 picot sc, 27 sc, 9 hdc petals) Your project will start to pucker a bit after this round, but we'll flatten it out in a few rounds.
- ch 1, *FPhdc around FPsc, [sc in next st, picot sc in next st] 3 times, sc in next st, FPhdc around FPsc, BPdc around next 7 hdc sts; repeat from * around, join with sl st to first FPhdc. (18 FPhdc, 9 BPdc petals, 36 sc, 27 picot sc)
- ch 1, *FPhdc around FPhdc, sk 3 sts, 7 dc in next st, sk 3 sts, FPhdc around FPhdc, BPsc around next 7 sts; repeat from * around, join with sl st to first FPhdc. (144)
- ch 1, *hdc in FPhdc, BPhdc around next 7 sts, hdc in FPhdc, hdc in next 7 sts; repeat from * around, join with sl st to first hdc. (144 hdc)
- ch 1, BPsc in each st around, join with sl st to first BPsc. (144)
- ch 1, [sc in next st, picot sc in next st] 6 times, sc in next st,
hdc in next st, (3 dc cluster, ch 1), in next st,
*sk st, (3 dc cluster, ch 1) in next st, sk st,
(tr, ch 1, tr, ch 1) in next, sk st, (3 dc cluster, ch 1) in next st, sk st, 3 dc cluster in next st,
hdc in next st, [sc in next st, picot sc in next st] 12 times, sc in next st,
hdc in next st, (3 dc cluster, ch 1) in next st; repeat from * around,
ending final side with (tr, ch 1, tr, ch 1,) in next,
sk st, (3 dc cluster, ch 1) in next st, sk st, 3 dc cluster in next st, hdc in next st,
[sc in next st, picot sc in next st] 6 times,
join with sl st to first sc. (Each side: 4 3-dc clusters, 2 hdc, 2 tr, 13 sc, 12 picot sc) - ch 1, sc in next 12 sts,
*sk st, 5 dc in hdc, sc in ch-1 sp between 3 dc clusters from previous round,
skip next ch-1 sp, work (tr2tog, ch 2, tr2tog, ch 2, tr2tog, ch 2, tr2tog) in next ch-1 sp,
sc in ch-1 sp between 3 dc clusters, 5 dc between hdc and sc sts from previous round,
sk 2 sts, sc in next 22 sts;
repeat from * around, omitting 12 sts at the end of final repeat,
join with sl st to first sc. (Each side: 4 tr2tog, 2 5dc shells, 24 sc) - (The tr2tog worked in this round are worked on tr stitches and in the corner ch-1 space from round 19, 2 rounds below.
They are made under and around the tr2tog that were made in the previous round.
This should push the tr2tog from round 20 to the back.)
ch 1, BPsc around next 10 sts,
*BPhdc around next 7 sts, BPdc around next sc,
work tr2tog around first tr2tog made in previous round by working on the first tr from round 19 (2 rows below) and in ch-1 sp from round 19,
3 sc in first ch-2 sp between tr2tog clusters in previous round,
work tr2tog into the ch-1 sp from round 19 and around second tr2tog made in previous round,
(2 hdc, ch 2, 2 hdc) in second ch-2 sp from previous round,
tr2tog into ch-1 sp from round 19 and around third tr2tog made in previous round,
3 sc in third ch-2 sp,
tr2tog around last tr2tog made in previous round by working first leg in ch-1 sp from round 19 and second leg around tr from round 19,
BPdc around sc, BPhdc around next 7 sts,
BPsc around next 18 sc;
repeat from * omitting 10 BPsc on final repeat,
join with sl st to first BPsc.
(Each side: 18 BPsc, 14 BPhdc, 2 BPdc, 4 tr2tog, 6 sc, 4 hdc) - ch 1, sc in next 17 sts,
*hdc in next 3 sts, sc in next 5 sts,
(2 sc, ch 1, 2 sc) in ch-2 sp in corner,
sc in next 5 sts (Note: the first of the 5 stitches you are working into will look like a chain, so be careful not to miss it!),
hdc in next 3 sts, sc in next 32 sts;
repeat from * around, omitting 17 sts in final repeat,
join with sl st to first sc. (Each side: 46 sc, 6 hdc) - Fasten off and then weave in ends.
- Block to finish.
Winter Opulence
Granny Square Pattern
Take a moment to assess your work, because your project should be starting to flatten out at this point.