Ear Warmer
by Rebecca Langford https://yarnandchai.com/hope-earwarmer/
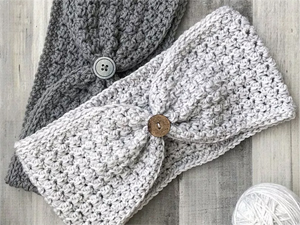
Ear Warmer
Skill Level: Easy
Finished Size: 17? x 3.5? (toddler), 18? x 4? (child), 20? x 4.5? (teen), 21? x 4.5? (adult)
Materials:
- Crochet hook: 5.0 mm (H)
- #3 weight yarn: 80 yds (toddler), 95 yds (child), 115 yds (teen), 120 yds (adult).
Abbreviations, Notes and Tips:
- ST/STS (stitch/stitches)
- SL ST (slip stitch)
- SK (skip)
- CH (chain)
- SC (single crochet)
- HDC (half double crochet)
- SC+HDC (complete a full single crochet and a full half double crochet in the same stitch)
- 3rd LOOP (work stitch into 3rd loop only — see “Special Stitch”)
- 3rd Loop Only
Half double crochet stitches have a 3rd loop that we utilize in this pattern. When working in turned rounds, as in this pattern, the 3rd loop can be found just below the front loop on the side of the work that is facing you. When instructed to work in “3rd loop only”, insert your hook into this special loop. This creates a delicate braided look on the opposite side of the pattern.
- This pattern is written in American Standard Terms.
- CH1s at the beginning of rounds do not count as a stitch in the final stitch count.
- To resize earwarmer, your starting chain can be any odd number.
- Pattern is written for toddler size with additional sizes in brackets [child, teen, adult]. So, for example, if it says “CH71 [75, 85, 89]”, the first number is for the toddler size, and the numbers in brackets are child, teen, and adult instructions, respectively. If you are working from printed instructions, it helps to circle or highlight the numbers you are following before you begin.
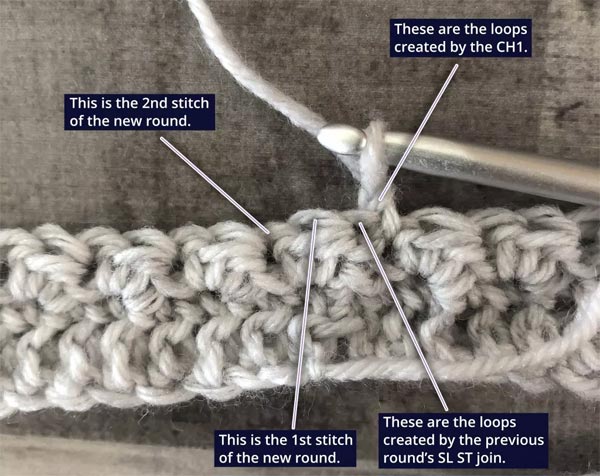
- Knowing where to place your first stitch can be tricky when working in joined rounds. Usually, it doesn’t matter as long as you’re consistent, but for this pattern, it does matter… especially from Round 4 on! So, here is an image to help you identify where to put your first stitch. Because Round 4 instructs you to skip the first stitch, you will put your SC+HDC combo in the stitch marked as the 2nd stitch (which is also easy to find thanks to the spaces created by the SC+HDC combos from Round 3).
Joining Rows
Instructions:
To begin: CH71 [75, 85, 89].
- Round 1: HDC in 2nd CH from hook and in each remaining CH. Bring ends together, without twisting, and join to the top of the first ST with a SL ST. (70 [74, 84, 88])
- Round 2: CH1, turn. SC in 3rd loop of each ST around. Join to the top of the first ST with a SL ST. (70 [74, 84, 88])
- Rounds 3-14 [3-16, 3-18, 3-18]: CH1, turn. SK first ST, SC+HDC in next ST. (SK next ST, SC+HDC in next ST) around. Join to the top of the first ST with a SL ST. (70 [74, 84, 88])
- Round 15 [17, 19, 19]: CH1, turn. HDC in each ST around. Join to the top of the first ST with a SL ST. (70 [74, 84, 88])
- Round 16 [18, 20, 20]: CH1, turn. SC in 3rd loop of each ST around. Join to the top of the first ST with a SL ST. (70 [74, 84, 88])
- Fasten off, leaving a long tail for cinching. Use yarn needle and starting tail to sew the small gap between the first and last stitches of Round 1 closed, then weave in that tail only.
- Thread the long finishing tail through your yarn needle and gently set it aside. Gather the seamed section of the headband, and fold in half so that the fold is facing you.
- Holding on to the fold with one hand, use your other hand to pinch the upper half in half again. The top edge of the earwarmer should be facing down. Grasp the fold together with the first fold, then repeat with the bottom section. When you’re finished, you should be pinching three folds together, with both the top and bottom edges of the earwarmer facing down.
- Run your yarn needle through all three sections of gathered material. The closer you get to the surface, the better your cinch will look; so I run mine right under just a couple strands of each fold.
- Wrap the yarn around the underside of the cinch, then through the sections again. Do this a few times to secure the cinch, then thread the needle up through the 1st hole of the button and back down through the 2nd hole, position it on the cinch, and wrap yarn around to the underside to tie off. (If your button has four holes, complete the first two, wrap yarn around the bottom, then come back and complete the last two before tying off.) Weave in the tail.
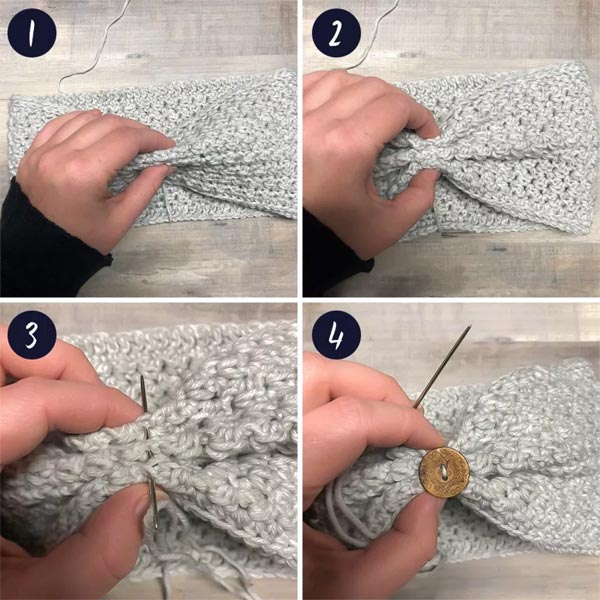
Cinching