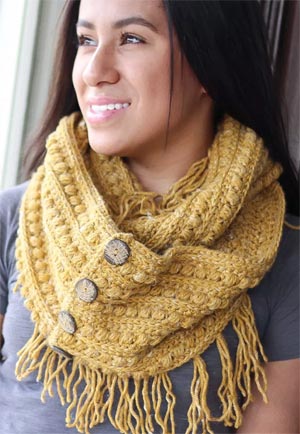
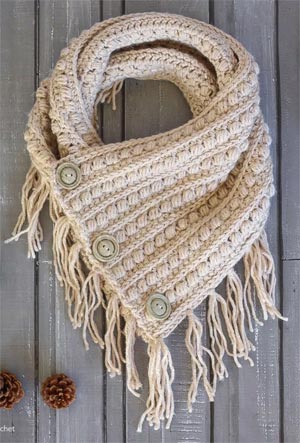
Malia Buttoned Cowl

Malia Buttoned Cowl
YouTube instructions
Skill Level: easy
Finished Size: 30.5" long X 8" wide
Materials:
- Crochet hook: 5.5mm size I
- Yarn: 355 yards of #4 aran weight. Yarn Bee's Rustic Romantic used in sample photos in "Sugared Oats color.
- Yarn needle
- 3 buttons 1" to 1⅛"
Gauge: To ensure the best results, the gauge check is a swatch taken straight from the pattern. Upon completion, you should have a 4" square. If yours is larger, consider using a smaller hook or a thinner #4 yarn. If yours is smaller, consider using a larger hook.
Pattern for Gauge:
CH17.
Row 1: SC in 2nd CH from hook and in each remaining CH. (16)
Row 2: CH1, turn. SC in first ST. (SK next ST, LBS in next ST) 7 times. SC in final ST. (16)
Row 3: CH1, turn. HDC in each ST across. (16)
Row 4: CH1, turn. SC in first ST. SC in 3rd loop of each of the next 14 STS. SC in final ST. (16)
Row 5: CH1, turn. SC in each ST across. (16)
Row 6: CH1, turn. SC in first ST. (LBS in next ST, SK next ST) 7 times. SC in final ST. (16)
Row 7: CH1, turn. HDC in each ST across. (16)
Row 8: CH1, turn. SC in first ST. SC in 3rd loop of each of the next 14 STS. SC in final ST. (16)
Row 9: CH1, turn. SC in each ST across. (16)
Rows 10-16: Repeat Rows 2-8. (16)
Terms and Abbreviations:
- FHDC: foundation half double crochet, see Special Stitches below
- st/sts: stitch/stitches
- sl st: slip stitch
- sk: skip
- ch: chain
- sc: single crochet
- hdc: half double crochet
- lbs: large bean stitch, see Special Stitches below
- blo: back loop only
- 3rd loop: work stitch into 3rd loop only, see Special Stitches
Foundation Half Double Crochet (FHDC)
This is the recommended way of beginning the pattern and is better shown than explained, so please watch the included tutorial video as a guide. There is also an optional classic chain start noted in the pattern, if you would like to do that instead.
Large Bean Stitch (LBS)
Insert hook into stitch, yarn over and pull through (2 loops on hook). Yarn over, insert hook into same stitch, yarn over and pull through (4 loops on hook). Yarn over, insert hook into same stitch, yarn over and pull through (6 loops on hook). Yarn over, insert hook into same stitch, yarn over and pull through (8 loops on hook). Yarn over and pull through all 8 loops. Chain 1 to close the stitch. (Because this stitch creates two sets of loops - one when creating the bean, and one when closing the stitch - each completed Large Bean Stitch will count for two stitches in the row or round's final stitch count.)
Notes:
(1) This pattern is written in American Standard Terms.
(2) CH1s at the beginning of rows do not count as a stitch in the final stitch count.
(3) A video tutorial is available up in the post, or by clicking here.
 |
 |
- Row 1: FHDC* 108. (*Alternate start: CH109, HDC in 2nd CH from hook and in each remaining CH) (108)
- Row 2: CH1, turn. SC in first ST. SC in 3rd loop of each of the next 106 STS. SC in final ST. (108)
- Row 3: CH1, turn. SC in each ST across. (108)
- Row 4: CH1, turn. SC in first ST. (SK next ST, LBS in next ST) 53 times. SC in final ST. (108)
- Row 5: CH1, turn. HDC in each ST across. (108)
- Row 6: CH1, turn. SC in first ST. SC in 3rd loop of each of the next 106 STS. SC in final ST. (108)
- Row 7: CH1, turn. SC in each ST across. (108)
- Row 8: CH1, turn. SC in first ST. (LBS in next ST, SK next ST) 53 times. SC in final ST. (108)
- Row 9: CH1, turn. HDC in each ST across. (108)
- Rows 10-25: Repeat Rows 2-9, in order, 2 more times. (108)
- Rows 26-29: Repeat Rows 2-5. (108)
- Row 30: CH1, turn. SC in first ST. SC in 3rd loop of each of the next 106 STS. SC in final ST. (108)
Fringe: Cut about 90 9" long strands of yarn. (I wrap mine around a 9" cutting board.) With the textured (right) side of the cowl facing up, and the edging (if you chose to use edging) on the left side, start at one bottom corner and attach them in groups of 3 strands every 4 stitches along the entire bottom edge of the cowl. (If you don't know how to attach fringe, see video tutorial for guidance.)
Buttons: Attach buttons to bottom of cowl using the diagram shown.
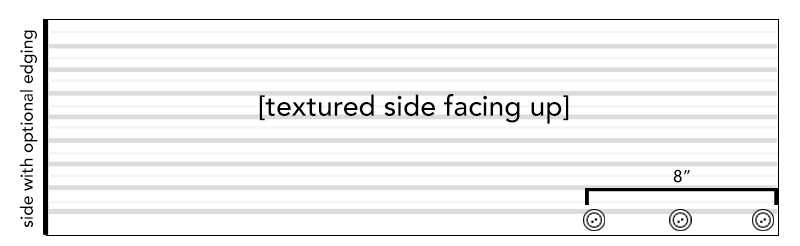
Button placement