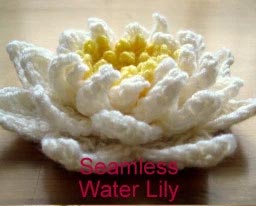
Water Lily
by Esther Chandler, makemydaycreative.com
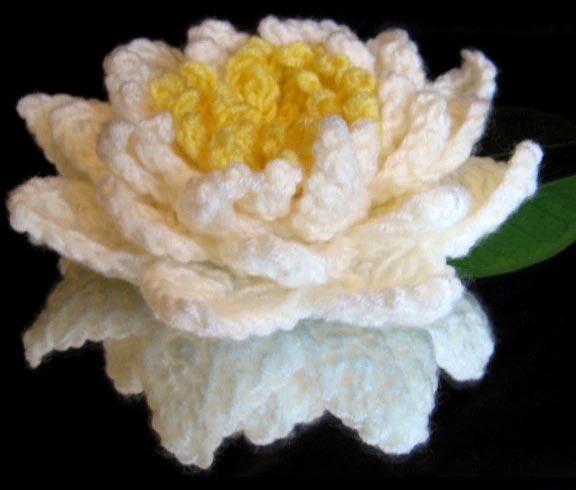
I've been looking for a good water lily pattern for a while, and whilst I've seen a few most of them require sewing several layers together. Also, most water lilies I have seen have 8 petals around — but most of the patterns out there use 6 petal repeats. A minor detail I know, but it's nice to be accurate!
You can use these for whatever you like really. I'm thinking of making a few more and then displaying on mirrored glass along with leaves as a centrepiece for a table. Or adding a few rows to turn it into squares for a cushion.
Skill Level:
Finished Size:
Materials:
- White (or how about pink or purple?) dk yarn. (I used Rico baby so soft — approx 40 m)
- Yellow dk yarn (I used Rico baby so soft — approx 10 m)
- size 4mm hook
Instructions:
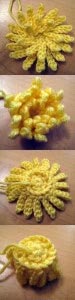
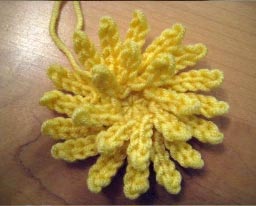
Yellow center
- Begin with a magic ring. Rnd 1: 8hdc into ring, slst to front loop of frist hdc to join. Pull ring closed. (8sts)
- (flo)*Ch 4, slst into 2nd ch from hook, 2 more slst (down the chain), slst into the next st, repeat from * 7 more times. Work the final slst into the back loop of R1. (8 center stamen made.)
- (blo of each st in Rnd 1) Ch 1 (does not count as st), 2 sc in each st around, join with slst into f.l. of 1st sc. (16 sts)
- (Work flo of each st in R3) * Ch 5, slst into 2nd ch from hook, 3 more slst (down the ch), slst into next st, repeat from * 15 more times. Work the final slst into the back loop of R3. (06 outer stamen made) Fasten off and join white yarn.
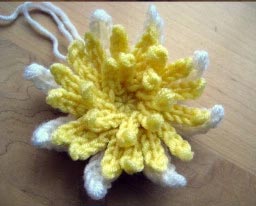
- (Work in blo of each st in R3.) Ch 1 (does not count as st), *2 sc, sc, repeat from * around, join with slst into fl of 1st sc (24 sts)
- Work flo in each st of Rnd 5. Ch 1 (does not count), *sc, ch 5, slst in 2nd ch from hook, sc in next ch, hdc in the next ch, dc in the final ch, fpdc of the sc at the start of the chain, slst in the next st, sc, repeat from * 7 more times, but omit the final sc and work a slst to join. (8 innermost petals made.)
- Work blo of each st of Rnd 5. Ch 1 (does not count) *2 sc, sc, sc, repeat from * around, join with slst into fl of 1st sc. (32 sts.)
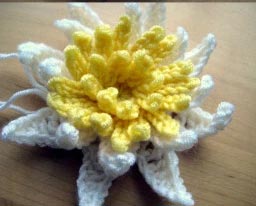
- Ch 1, slst in fl of st behind (i.e. the last sc of R7) — this will stagger the next row of petals from the row just worked.
Work flo of each st in R7. Ch 1, (does not count), *sc, ch 6, slst in 2nd ch from hook, sc in next ch, hdc in next ch, dc in next ch, tr in final ch, fptr insc at the start of the chain, sk 1 st, slst in the next st, sc, repeat from * 7 times, but omit the final sc and work a slst to join (8 petals made) - Work blo of each st in R7. Ch 1 (doesn't count) *sc, sc, sc, 2 sc, repeat from * around. Join with slst into fl of 1st sc. (40 sts.)
- Work flo of each st in R9. *Ch 6, slst 2nd ch, 4 more slst down chain, slst in 1st st, sc 5 times, repeat from * 7 times, omitting last sc, sl to join (8 "arms" make.)
- Turn work and sl-st twice so that you are starting the row from between the two arms. Turn the work back to work into the first arm (there will be 5 chains, ignoring the turning ch).
*Work into each ch as follows: (dc, dc, hdc, sc, sl-st).
Now work back down the other side of the arm — you can chain 1 here if you find it difficult to turn — (slst, sc, hdc, dc,dc).
On the main body of flower: sk 1 st, sl-st, sl-st, repeat from * 7 times, omitting the last sc — join with a sl-st into the 2nd of the two slsts worked at the beginning of this round. (8 petals made) - (Work in blo. of each st in R9) Ch2, sl-st into b.l. of 1st st in R10.
Ch1 (does not count as st), *2sc, sc, sc, sc, sc, repeat from * around, join with a sl-st into f.l. of 1st sc (48sts).
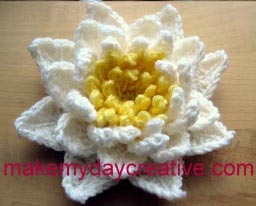
For a more closed lily, or to allow loops for turning this flower into a square motif, work R13 into flo. as instructed (as per example here). If you prefer an outer row of petals which lies flatter you can work both loops as you would normally for R13. (Make the final slst of R12 through both loops in this case.) - Work in flo. of each st in R12) *Chain 7, turn, sl-st in 2nd ch from hook, 5 sl-st, sc 6 times, repeat from * 7 more times, omitting last sc and joining with a sl-st (8 arms made).
- As with R11, turn and make 3 slsts back along the last sc's just made. Turn and work the next sts up the 1st arm:
*tr, tr, dc, hdc, sc, slst, ch2. Now work down the 2nd side of the arm: sl-st, sc, hdc, dc, tr, tr
Sk 3 sts, sl-st (into the middle st between the arms). Repeat from * 7 more times.
Tip: If you find that your petals curve to one side, try crocheting your chain more loosely or tightly to correct it.
.jpg)
Round 6
Round 10 makes "arms" which the next set of petals are worked into. Most people work into the back loop only when working down a chain. I suggest you do that here because you can then work into the front looks of the chains on R11.
Round 11 is worked around R10, working up and down the arms to make the penultimate row of petals. When working up the first side of the "arms" you should have back loops available from the chain. When working down the second side of the arms, it is easier to work into just to back loops of the slsts. This also leaves a nice ridge up the centre of the petals. If you prefer though, you can work through both loops of the slsts.
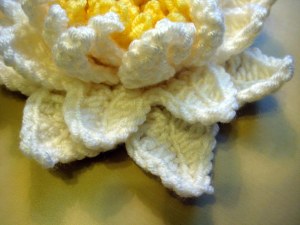
Outer petals with ridge running up center
 |
 |
 |
|
 |
 |