Baby Girl Jacket
Link to YouTube Video Instructions.
Sizes from 1 to 5 years old.

Baby Girl Jacket
Skill Level:
Finished Size:
Materials:
- light or medium weight yarn:
1-2 years approximately 200 grams (7 ounces),
3-5 years 250-300 grams (9 oz to 10.6 oz ) - 4 mm (G) crochet hook
- 6 buttons (1.5 - 1.8 mm diameter) (.5 to .75 inches)
- scissors
- tapestry needle
- small amount of contrasting color
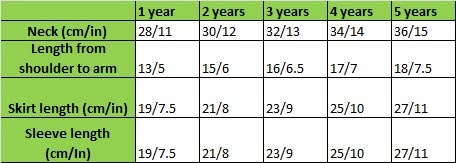
Final Dimensions for this Jacket
Gauge: 15 stitches and 12 rows for a 10 cm / 4" square.
If you don't get to this gauge try to adapt this pattern to your gauge following the instructions here Ok, hope I didn't forgot anything important for you to start this baby girl jacket.
Abbreviations, Notes and Tips:
- This jacket is worked from top to bottom. Instructions start at the neck.
- Inc = hdc, ch, hdc in the same space.
Instructions for size 1 lead, with the others following in parenthesis.
- Foundation: Ch 60(65, 70, 75, 80).
- Row 1: *hdc 11(12, 13, 14, 15), inc* X 4, hdc 12(13, 14, 15, 16), ch 2 turn.
- Row 2: For all sizes: (button holes) hdc 1, ch 2, skip 2, hdc 3, ch 2 skip 2,
hdc in next sts until the first corner (the ch 1 sp in the inc of previous row)
inc in the ch 1 space. *Hdc in each to next corner, inc in the ch 1 space.* Hdc to end of row.
(This button hole row will be repeated every 6 rows to give a total of 3 button hole rows. ) - Row 3: *Hdc in each st to corner, inc at corner ch 1 sp.* X 4. Hdc to end of row, ch 2, turn.
- Row 15 (17, 18, 19, 20): Isolating the armholes:
Hdc in each stitch until first corner. Hdc in the ch 1 space.
Skip all the stitches (the sleeve) until the next corner. Hdc in the ch 1 space there.
Continue to hdc in each stitch until the marked stitch at center back.
Hdc in the mid-back stitch. Ch 35(40, 40, 45, 45).
Hdc in next stitches until next corner. Hdc in the ch 1 space.
Skip to the next corner. Hdc in the ch 1 space. Hdc to end of row. Ch 2, turn. - Row 16(18, 19, 20, 21): Hdc in each stitch including the pleat at mid-back. Ch 2, turn.
- Row 17 - 23(19-25, 20-28, 21-30, 22-32): Repeat Row 16(18, 19, 20, 21). Fasten off.
Here's where the garment can be extended from jacket to coat length. - Row 1: For all sizes: Insert hook in the first stitch in the armpit. Hdc in each stitch around. Join with slip stitch into the first hdc. New round starts with standing hdc or ch 2. Turn with each round to keep the rows looking like those in the yoke.
If you choose to work in rounds, work on the right side and on the wrong side to keep the same look of the stitch. - Row 2-27(2-29, 2-32, 2-34, 2-36): Repeat row 1. Fasten off.
- We made 4 extra rows on the sleeve, because the sleeve will be folded for a cuff.
- Repeat these instructions for the other sleeve.
- On the inside of the yoke stitch the top of the mid-back pleat in place as suggested in the picture above.
- Row 1: For all sizes: Right side facing. Skip first 6 sts. Hdc in each until only 6 sts remain in row. Ch 2, turn.
- Row 2: Hdc 2 in first st, hdc in each until last stitch. Hdc 2 in last stitch.
- Row 3: Repeat row 2.
- Row 4: Hdc in each stitch across.
- Row 5-6: (or more if you want a higher collar.) Repeat row 4.
- Edge all parts with a row of single crochet.
- Make a row of contrasting slip stitches at the base of the single crochet edging. On collar and sleeves work on the wrong side of the fabric as this will become the right side when the collar & cuffs are turned.
- Make a bow with the contrasting yarn and sew it at the top of the mid-back pleat. With sc make the bow 8 sts X 10 rows. Small piece of 4 sts wide to tie the middle of the bow.
- Sew the buttons.
(Repeat row 3) 14(16, 17, 18, 19) times, inserting the button hole row every 6 rows.

Yoke
Next, we'll isolate the armholes and just work on the skirt and the pleat in the center back.
Count the stitches in the back and place a stitch marker in the middle stitch for the pleat.
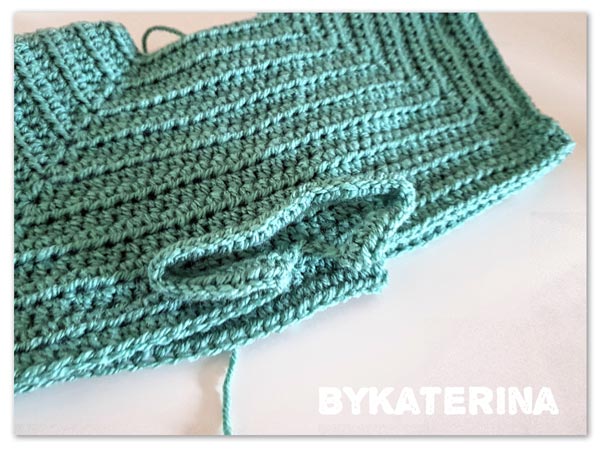
Yoke with Foundation for Back Pleat
Row after the chain for the pleat was inserted.
Sleeve
Notes:
Collar
Trimming the jacket: