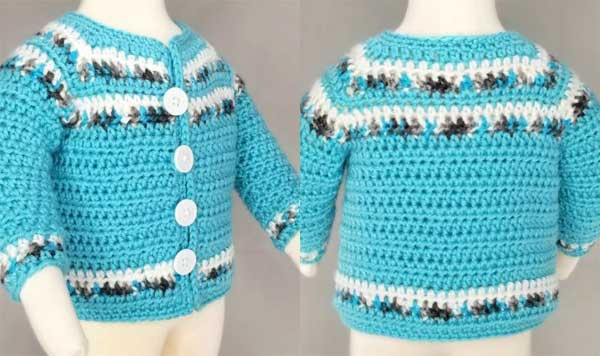
Essential Baby Sweater
By Tamara Kelly @ Moogly
The Essential Baby Sweater is that go-to, easy-peasy, every baby shower gift crochet pattern. It's simple, basic, totally unisex — and super customizable! Read on for this free Moogly baby cardigan crochet pattern!
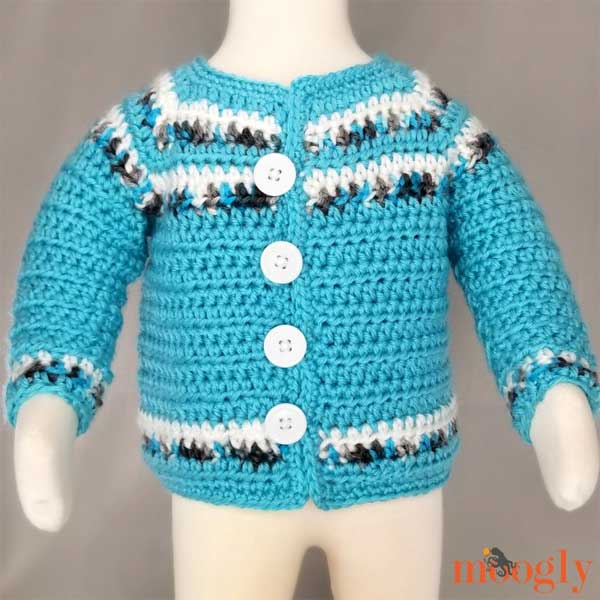
Essential Baby Sweater
Sizes included: 0-6 months
Materials:
- 6.0mm crochet hook (J)
- 230 yds #4 worsted acrylic yarn + 3 contrasting colors
- 4 buttons: determine size before making button loops
Notes:
Odd rows = Right Side (RS); Even Rows = Wrong Side (WS)
Make Corner — 3 hdc in the indicated st, place a st marker in the center of the 2nd hdc.
The sleeves on this sweater are made in turned rounds, or joined rows. This means that the even numbered rows are worked from the inside of the sleeve.
In Rnd 2 of the Button Holes and Final Edging, the ch-5 button loop may need to be adjusted for your button choice — be sure to check before you finish.
Essential Baby Sweater
front & back views
Instructions:
Row 1: With Color A, ch 43, hdc in the 2nd ch from hook, hdc in the next 6 ch, make corner in the next ch, hdc in the next 6 ch, make corner in the next ch, hdc in the next 12 ch, make corner in the next ch, hdc in the next 6 ch, make corner in the next ch, hdc in the last 7 ch finishing last st with Color B; turn. (50 sts)
Row 2: With Color B, ch 1, hdc in the first 8 sts, make corner (move st marker up from previous row), hdc in the next 8 sts, make corner, hdc in the next 14 sts, make corner, hdc in the next 8 sts, make corner, hdc in the last 8 sts finishing last st with Color C; turn. (58 sts)
Row 3: With Color C, ch 1, hdc in the first 9 sts, make corner, hdc in the next 10 sts, make corner, hdc in the next 16 sts, make corner, hdc in the next 10 sts, make corner, hdc in the last 9 sts finishing last st with Color A; turn. (66 sts)
Row 4: With Color A, ch 1, hdc in the first 10 sts, make corner, hdc in the next 12 sts, make corner, hdc in the next 18 sts, make corner, hdc in the next 12 sts, make, hdc in the last 10 sts finishing last st with Color B; turn. (74 sts)
Row 5: With Color B, ch 1, hdc in the first 11 sts, make corner, hdc in the next 14 sts, make corner, hdc in the next 20 sts, make corner, hdc in the next 14 sts, make corner, hdc in the last 11 sts finishing last st with Color C; turn. Break Color B. (82 sts)
Row 6: With Color C, ch 1, hdc in the first 12 sts, make corner, hdc in the next 16 sts, make corner, hdc in the next 22 sts, make corner, hdc in the next 16 sts, make corner, hdc in the last 12 sts finishing last st with Color A; turn. Break Color C. (90 sts)
Row 7: With Color A, ch 1, hdc in the first 13 sts, hdc in the marked st (remove 1st marker), ch 5, skip 18 sts, hdc in next marked st (remove 2nd marker), hdc in the next 24 sts, hdc in the next marked st (remove 3rd marker), ch 5, skip 18 sts, hdc in last marked st (remove 4th marker), hdc in the last 13 sts;turn. (54 hdc and 10 ch)
Row 8: Ch 1, hdc in each st and ch across; turn. (64 sts)
Row 9 — 17: Ch 1, hdc in each st across; turn. Finish last st of Row 17 with Color B. (64 sts)
Row 18: With Color B, rep Row 9, finishing last st with Color C, break Color B. (64 sts)
Row 19: With Color C, rep Row 9, finishing last st with Color A, break Color C. (64 sts)
Row 20: With Color A, rep Row 9, break Color A. (64 sts)
ADD SLEEVES (REPEAT FOR BOTH ARMHOLES):
Rnd 1: With Color A, from RS of sweater, join to center st of the armpit (bottom of armhole), ch 1, hdc 27 sts evenly around arm opening; join and turn. (27 sts)
Rnd 2: Ch 1, hdc in each st around until 1 st rem, skip last st; join. (26 sts)
Rnd 3 � 14: Repeat Rnd 2. Finish last st of Row 14 with Color B.
Rnd 15: With Color B, ch 1, hdc in each st around; join and turn finishing last st with Color C, break Color B. (14 sts)
Rnd 16: With Color C, rep Rnd 15 finishing last st with Color A, break Color C. (14 sts)
Rnd 17: With Color A, rep Rnd 15; break Color A. (14 sts)
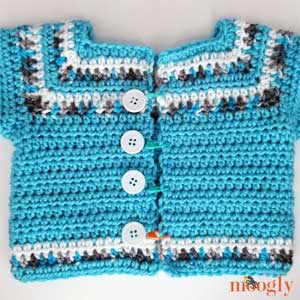
Placement of Button Loops
BUTTON HOLES AND FINAL EDGING:
Before beginning the next Round, plan the placement of your button loops and mark with a stitch marker. Note that the buttons and loops as shown are the boy's version — switch the buttons and loops to the opposite edges for a girl's version.
Rnd 1: With Color A, join to any st at back of neck, ch 1, sc in each st to front opening, ch 2, sl st along front edge, ch 2, sc in each st at bottom hem, ch 2, sl st along other side of front edge, ch 2, sc in each rem st at neck; join. Recheck placement of st markers for button loops, and move markers to sl sts.
Rnd 2: Ch 1, sc in each st, (sc, ch 2, sc) in each ch-2 corner, and (sc, ch 5, sc) in each marked st; join and break.
Sew on buttons opposite the button loops. See tutorial linked above, or use matching thread.
I hope you like this free crochet baby sweater pattern! I tried to make it easy and straight-forward, but still flexible. I can't wait to see all the fun things you all do with this free baby cardi crochet pattern!