Simple Diaper Cover
Like little PantiesBy Taylor Ann # Modern Made Home.com
These diaper covers are the perfect project to whip up for your next baby shower! What momma-to-be wouldn't love some of these cute little diaper covers to go with any outfit AND keep their baby cool?
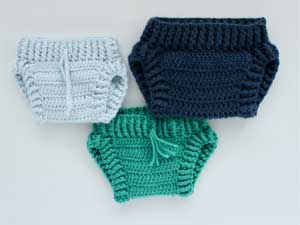
Simple Diaper Cover
Sizes included:
| Size | Waist |
| Newborn | 15 in. |
| 0-6 months | 15.5 in. |
| 6-12 months | 16 in. |
| 12-24 months | 16.5 in. |
Materials:
- 1 skein of worsted weight (4) yarn.
— I used acrylic but cotton would also be a great choice - 4.5 mm hook
- Stitch markers
Abbreviations:
- FPdc: Front post double crochet
- BPdc: Back post double crochet
- dc2tog: Double crochet two together
- Fdc: Foundation Double Crochet
- This piece is worked in 1 piece starting from the waistband, then the back, and ending in the front.
- Chain stitches do not count as stitches.
- Waistband:
- Fdc 61 then sl st into the first Fdc (NOT in the first chain 4) (61)
Add stitches here if needed and adjust body instructions accordingly. - Ch 1 and FPdc into the same stitch, BPdc, *FPdc, BPdc* around, sl st into first FPdc
- Rows 3 to 5 Repeat row 2
- Diaper Body (Starting at Back waist):
- Ch 1 and dc in the same stitch, dc in next 30, ch 1 and turn (31)
- Dc2tog, dc 27, dc2tog (29)
- Dc2tog, dc 25, dc2tog (27)
- Dc2tog, dc 23, dc2tog (25)
- Dc2tog, dc 21, dc2tog (23)
- Dc2tog, dc 19, dc2tog (21)
- Dc2tog, dc 17, dc2tog (19)
- Dc2tog, dc 15, dc2tog (17)
- Dc2tog, dc 13, dc2tog (15)
- Dc 6, dc2tog, dc 7, ch 1 and turn (14)
Adjust stitch count here if not before. - Rows 11-15- Dc across, ch 1 and turn (14)
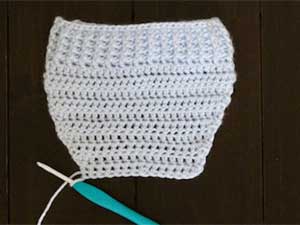
Back View (in progress)
- 2 dc in first stitch, dc 12, 2 dc, ch 1 and turn (16)
- 2 dc, dc 14, 2dc, ch 1 and turn (18)
- 2 dc, dc 16, 2dc, ch 1 and turn (20)
- 2 dc, dc 18, 2dc, ch 1 and turn (22)
- 2 dc, dc 20, 2dc, ch 1 and turn (24)
- Turn inside out, use stitch markers to attach leaving 3 unworked stitches on each side and whip stitch across
- Fasten off and sew in ends, turn right side out
- Leg Opening
- Starting at the bottom of the leg hole connect yarn, ch 1 and dc around evenly.
- Sl st into the first dc, ch 1, repeat *FPdc, BPdc* around
- Sl st into first FPdc, ch 1, FPdc into same stitch, BPdc, *FPdc, BPdc* around
- Sl st into first FPdc and fasten off Repeat on the other leg
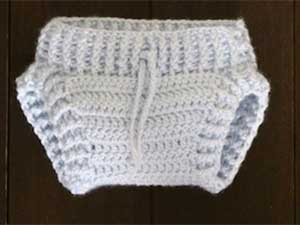
Front View (completed)
- Drawstring (Optional)
- Ch to the desired length and fasten off
- Sl st into the first dc, ch 1, repeat *FPdc, BPdc* around