Baseball Hat & Diaper Cover
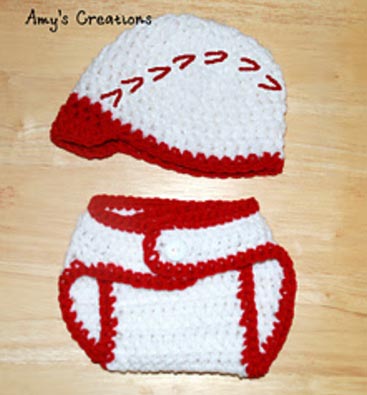
Baseball Hat & Diaper Cover
Sizes included: 0-3 Months
Materials:
- Red Heart Love White and Red yarn
- Button
- Crochet hooks: J, H, I.
- Yarn Needle
Abbreviations:
- sc : single crochet
- sl st : slip stitch
- ch : chain
- dc2tog : double croche 2 together (decrease)
- sc2tog : single croche 2 together (decrease)
Hat:
Instructions: White yarn, J hookCreate a Magic Circle with 12 dc, sl st on top of the chain 3, -12 dc
rnd 2. ch 3(counts as the first stitch), dc in same st. as joining, 2dc in each st. around. join with sl st on top of chain 3. -24 sts.
rnd 3. ch 3 (counts as the first stitch), *2dc in next st., dc in the next stitch, repeat from *around, join with sl st. -36 sts.
rnds 4-8. ch 3, dc in each stitch around. join with sl st. -36 sts. *Repeat for this round 5 times
rnd 9: Switch to an I hook, With Red yarn, ch 3, hdc in each stitch around. join with sl st. -36 hdc. Fasten off.
row 10: Switch to an I hook, With Red yarn, start from the back seam, the ch 3, which counts as a stitch, and count to the left 14 stitches, (including the ch 3), sl st with your red yarn, hdc in the next 9 hdc, sl st in the next. Turn
row 11: Ch 1, hdc in the next 9 hdc, ch 1, sl st in the next stitch, Turn
row 12: ch 1, hdc in the next 9 hdc, ch 2, sl st in the next sl st, sl st in the next stitch, Fasten off. Weave in the ends.
Optional: V-Stitch Marks on the Hat: Take your yarn needle and about 20 inches of yarn, Go to your visor, go inward toward the center about 2 hdc to make the v-stitch dash lines. Take your yarn needle and sew a 1 inch line going inward above the red visor and another 1 inch line go inward to make an triangle but without the bottom to the triangle. Then go up above that v-dash line and make another all the way to the other side to the back. Now go to the other side of the visor and go 2 hdc inward to the center and do the same thing to match the other v-stitch dash lines.
Diaper Cover
White yarn, H HookFoundation: CH 47
Row 1. sc in 2nd ch from hook and each stitch across. Turn (46 sc )
Row 2. ch 2, dc in each stitch across. Turn -46 dc
Row 3. Ch 1, sc in each stitch across. Turn -46 sc
Row 4. Slip Stitch into the next 12 stitches, in the 12 stitch, ch 2, dc in the next 23 stitches, leave the remaining 11 stitches unworked. Turn
Row 5. Ch 1, sc in each stitch across. Turn
Row 6. Ch 2, dc in each stitch across. Turn
Row 7. Ch 1, sc in each stitch across. Turn
Row 8. Ch 2, dc2tog decrease. dc in the next 20 stitches, dc2tog decrease. Turn
Row 9. Ch 1, sc in each stitch across. Turn
Row 10. Ch 2, dc2tog decrease, dc in the next 18 stitches, dc2tog decrease. Turn
Row 11. Ch1, sc in each stitch across. Turn
Row 12. Ch 2, dc2tog decrease, dc in the next 16 stitches, dc2tog decrease. Turn
Row 13. Ch 1, sc2tog decrease, sc in the next 14 stiches, sc2tog decrease. Turn
Row 14. Ch 2, dc2tog decrease, dc in the next 12 stitches, dc2tog decrease. Turn
Row 15. Ch 1, sc2tog decrease, sc in the next 10 stitches, sc2tog decrease. Turn
Row 16. Ch 2, dc in each stitch across, Turn
Row 17. Ch 1, sc in each stitch across, Turn
Row 18. Ch 2, dc in each stitch across, Turn
Row 19. Ch 1, sc in each stitch across, Turn
Row 20. Ch 2, dc in each stitch across, Turn
Row 21. Ch 1, sc in each stitch across, Turn
Row 22. Ch 2, dc in each stitch across, Turn
Row 23. Ch 1, sc in each stitch across, Turn
Row 24. Ch 2, dc in each stitch across, Turn
Row 25. Ch 1, sc in each stitch across, Turn
Row 26. Ch 2, dc in each stitch across, Turn,
Fasten off.
Row 27. Slip stitch With Red yarn, sc evenly around entire diaper cover,
Fasten off.
Notes:
Baby's Waist is about 13-14 inches.
Sew on the button on the center top of the diaper cover. The end of the side flaps with dc will fasten around the button. or you can sew two buttons on top side by side and place the each flap over the buttons.