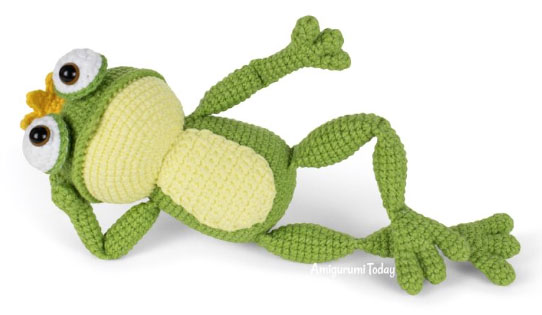
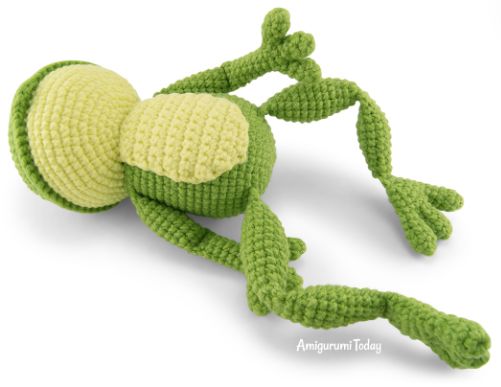
Frog Prince
by Amigurumi Today
https://amigurumi.today/free-crochet-frog-prince-amigurumi-pattern/

Frog Prince
Skill Level: advanced
Finished Size: 6.3" tall and about 3.9" in sitting position.
Materials:
- Fine (4 ply) semi-cotton yarn Yarnart Jeans (160 m / 50 g; 55% cotton, 45% acrylic)
- 2.0 mm crochet hook
- Fiberfill
- 10 mm safety eyes
- Scissors and needle
Abbreviations, Notes and Tips:
Frog Prince
Instructions:
- Head:
- Rnd 1: 6 sc in magic ring [6]
- Rnd 2: (inc) X 6 [12]
- Rnd 3: (sc in next st, inc) X6 [18]
- Rnd 4: (sc in next 2 st, inc) X 6 [24]
- Rnd 5: (sc in next 3 st, inc) X 6 [30]
- Rnd 6: (sc in next 4 st, inc) X6 [36]
- Rnd 7: (sc in next 5 st, inc) X6 [42]
- Rnd 8: (sc in next 6 st, inc) X6 [48]
- Rnd 9: (sc in next 7 st, inc) X6 [54]
- Rnd 10-12: sc in all 54 st [54] Fasten off and weave in the end.
- Rnd 1: 6 sc in magic ring [6]
- Rnd 2: (inc) X 6 [12]
- Rnd 3: (sc in next st, inc) X6 [18]
- Rnd 4: (sc in next 2 st, inc) X 6 [24]
- Rnd 5: (sc in next 3 st, inc) X 6 [30]
- Rnd 6: (sc in next 4 st, inc) X6 [36]
- Rnd 7: (sc in next 5 st, inc) X6 [42]
- Rnd 8: (sc in next 6 st, inc) X6 [48]
- Rnd 9: (sc in next 7 st, inc) X6 [54]
- Rnd 10-13: sc in all 54 st [54] Put bottom part and upper part of head together with green facing to you. Join two parts by crocheting Rnd 14 through the loops of both edges: two loops of green edge and one farthest loop of yellow edge.
- Rnd 1: 6 sc in magic ring [6]
- Rnd 2: (inc) X 6 [12]
- Rnd 3: (sc in next st, inc) X6 [18]
- Rnd 4: (sc in next 2 st, inc) X 6 [24]
- Rnd 5: (sc in next 3 st, inc) X 6 [30]
- Rnd 6: (sc in next 4 st, inc) X6 [36]
- Rnd 7: (sc in next 5 st, inc) X6 [42]
- Rnd 8: (sc in next 6 st, inc) X6 [48]
- Rnd 9 - 13: sc in all 48 st [48]
- Rnd 14: (sc in next 14 st, dec) X3 [45]
- Rnd 15-16 sc in all 45 sts [45]
- Rnd 17: (sc in next 13 st, dec) X3 [42]
- Rnd 18-19 sc in all 42 sts [42]
- Rnd 20: (sc in next 12 st, dec) X3 [39]
- Rnd 21-22 sc in all 39 sts [39]
- Rnd 23: (sc in next 11 st, dec) X3 [36]
Fasten off and leave tail for sewing.
Do not assemble head and body before belly is attached to body.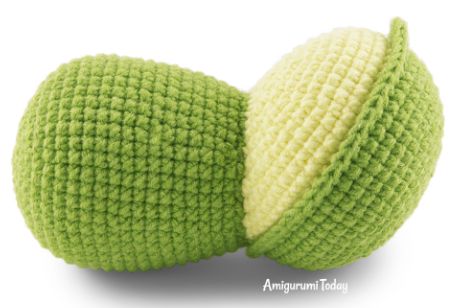
Head
Arms (make 2):
Use green yarn. Stuff slightly with fiberfill as you go.
- Fingers. Rnd 1: 6 sc in magic ring [6]
- Rnd 2-3: (sc) X 6 [6] Fasten off and cut off the yarn.
- Rnd 4: continue working on 3rd finger: sc in next 3 st, now work on 2nd finger: sc in next 3 st, then work on 1st finger: sc in next 6 st, work again on 2nd finger: sc in next 3 st, and finally, sc in next 3 st on the 3rd finger [18]
- Rnd 5: (sc in next st, dec) X6 [12]
- Rnd 6: (sc in next st, dec) X4 [8]
- Rnd 7-12: sc in all 8 st [8]
- Rnd 13: flatten the edges and crocdhet sc in next 4 st through both edges closing the hole.
- Rnd 14: crochet sc in next 4 st in front loops only, and crochet sc in next 4 back loops [8]
- Rnd 15: (sc in the next 3 st, inc) X2 [10]
- Rnd 16-21: sc in all 10 st [10]
- Rnd 22: (sc in next 3 st, dec) X2 [8]
- Rnd 23: flatten the edges and crochet sc in next 4 st through both edges closing the hole.
- Rnd 1: 6 sc in magic ring. [6]
- Rnd 2: (sc in next 2 st, inc) X2 [8]
- Rnd 3: sc in all 8 st [8]
- Rnd 4: (sc in next 2 st, dec) X2 [6]
- Rnd 5: sc in all 6 st [6] Fasten off and cut yarn. Crochet two more toes in same way. When finishing the last toe, don't cut yarn.
- Rnd 6: continue working on 3rd toe: sc in next 3 st, now work on 2nd toe: sc in next 3 st, then work on 1st st toe: sc in the next 6 st, work agaqin on 2nd toe: sc in next 3 st, and finally, sc in next 3 st on the third toe. [18]
- Rnd 7: (sc in the next 4 st, dec) X3 [15]
- Rnd 8: (sc in next 3 st, dec) X3 [12]
- Rnd 9: sc in all 12 st [12]
- Rnd 10: (sc in next st, dec) X4 [8]
- Rnd 11: flatten the edges and crochet sc in next 4 st through both edges closing the hole.
- Rnd 12: crochet sc in the next 4 st in front loops only, turn and crochet sc in next 4 back loops [8]
- Rnd 13-14: sc in all 8 st [8]
- Rnd 15: (sc in next 3 st, inc) X2 [10]
- Rnd 16: sc in all 10 st [10]
- Rnd 17: (sc in next 4 st, inc) X2 [12]
- Rnd 18-20: sc in all 12 st [12]
- Rnd 21: (sc in next st, dec) X4 [8]
- Rnd 22: sc in all 8 st [8]
- Rnd 23: flatten the edges and crochet sc in next 4 st through both edges closing the hole.
- Rnd 24: crochet sc in next 4 st in front loops only, turn and crochet sc in next 4 back loops [8]
- Rnd 25: (sc in next 3 st, inc) X2 [10]
- Rnd 26: sc in all 10 st [10]
- Rnd 27: (sc in next 4 st, inc) X2 [12]
- Rnd 28: (sc in next 5 st, inc) X2 [14]
- Rnd 29-33: sc in all 14 st [14]
- Rnd 34: (sc in next 5 st, dec) X2 [12]
- Rnd 35: (sc in next 4 st, dec) X2 [10]
- Rnd 36: sc in all 10 st [10]
- Rnd 37: flatten the edges and crochet sc in next 5 st through both edges closing the hole.
- Rnd 1: 6 sc in magic ring [6]
- Rnd 2: (inc) X 6 [12]
- Rnd 3: (sc in next st, inc) X6 [18]
- Rnd 4: sc in all 18 st. [18] Change to green yarn
- Rnd 5: sc in all 18 st (Back loops only) [18]
- Rnd 6: (sc in next st, dec) X6 [12] Stuff lightly
- Rnd 7: (dec) X6 [6] Fasten off yarn, leaving a small tail. Pass the yarn end through the front loops of the 6 stitches with hook or needle. Pull to close the hole.
- Row 1: sc in next 9 st beginning from 2nd st from hook. [9]
- Row 2: 1 ch, sc in next 8 st [9]
- Row 3: 1 ch, inc, sc in next 7 st [10]
- Row 4-5: 1 ch, sc in next 9 st [10]
- Row 6: 1 ch, inc, sc in next 8 st [11]
- Row 7-8:1 ch, sc in next 10 st [11]
- Row 9: 1 ch, inc, sc in next 9 st [12]
- Row 10-11: 1 ch, sc in next 11 st [12]
- Row 12: 1 ch, skip 1 st, sc in next 8 st, skip 1 st, sc in next st [10]
- Row 13: 1 ch, skip 1 st, sc in next 6 st, skip 1 st, sc in next st. [8]
- Row 14: 1 ch, skip 1 st, sc in next 4 st, skip 1 st, sc in next st [6]
- Row 15: 1 ch, skip 1 st, sc in next 2 st, skip 1 st, sc in next st [4] Fasten off leaving a tail for sewing.
- Rnd 1: 6 sc in magic ring. [6]
- Rnd 2: (inc) X6 [12]
- Rnd 3: (sc in next st, inc) X6 [18]
- Rnd 4: sc in all 18 st back loops only [18]
- Rnd 5-6: sc in all 18 st. [18]
- Rnd 7: (4 ch, sc in 2nd ch from hook, hdc in next ch, dc in next ch, skip 1st, sl st in next st) X6 Fasten off and hide tail.
Bottom Part: Yellow yarn
Green yarn
Rnd 14: sc in next 25 st, hdc in next st, {hdc and dc} in the same next st, {dc and hdc} in the same next st, hdc in next st, stuff the head with fiberfill, sc in the next 25 st, finish with sl st. Fasten off and weave in the end.
Body:
Green yarn
Crochet two more fingers in the same way. When finishing the last finger, don't cut yarn.
Join the three fingers together as follows:
Please note that the seam should be parallel to the palm.
Please note the seam should be perpendicular to the elbow.
Fasten off leaving a tail for sewing.
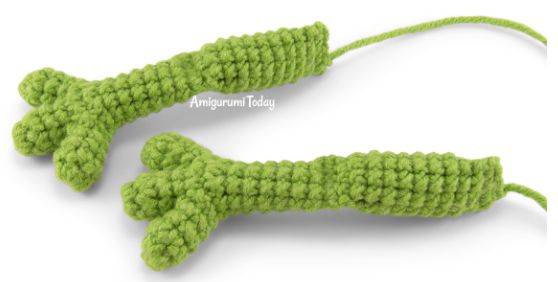
Arms
Legs (make 2)
Use green yarn. Stuff slightly with fiberfill as you go.
Toes:
Join three toes together as follows:
The seam should be parallel to the feet
The seam should be parallel to the feet.
The seam should be parallel to the feet.
Fasten off leaving a tail for sewing.
Legs
Eyes (make 2):
Start with white yarn. Then change to green after round 4.
Belly:
Yellow Yarn.
Ch 10 with yellow yarn. Continue working in turning rows. Begin each row with 1 ch, which is cjounded as 1 sc and located right above the stitch of the previous row.
Body with arms & legs
Crown:
Dark Yellow Yarn.
- Stuff the body with fiberfill and sew it to the yellow part of the head (between the middle point and the edge)
- Pin the belly right under the neck seam, then sew it on symmetrically.
- Sew on the arms at the level of Rnds 22-23 of the body.
- Sew the legs at the sides of the body ag Rnds 7-8.
- Sew the eyes to the front of the head 3 rounds above the mouth line. Give a special personality to your frog by choosing the directions of pupils' look.
- Sew the crown on top of the head.
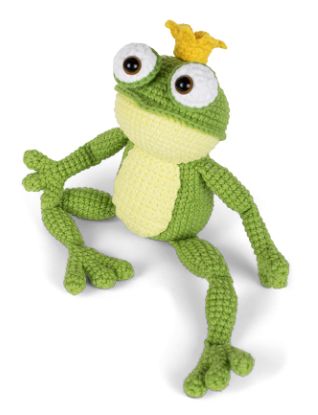
Finished!