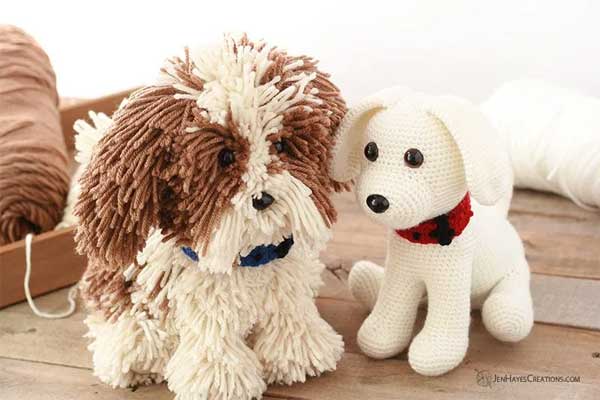
Sitting Puppy Dog
by Jen Hayes https://www.jenhayescreations.com/crochet-puppy-dog/
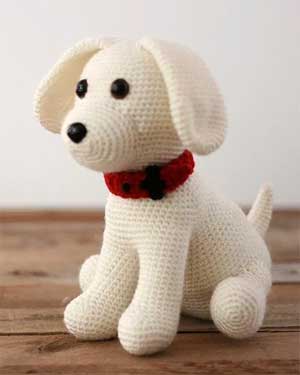
Sitting Puppy Dog
Skill Level: Advanced Intermidiate
Finished Size: Using hook size E/4 (3.5 mm) from the base to the top of the head, measurement is approximately 9.5 inches (24 cm) tall.
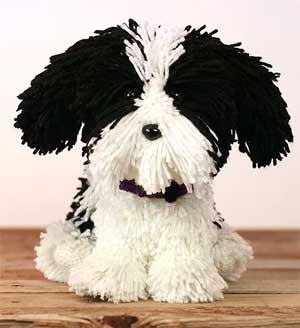
Sitting Fluffy Puppy Dog
Materials:
- Yarn: Red Heart Super Saver, especially for the fluffy version of the dog.
- Hook: 3.5 mm, E
- Stitch Markers
- Stuffing
- Pins
- Safety Eyes, 15mm
- Safety Nose, 20 mm
- Red Heart Super Saver (worsted 4-Medium, 100% acrylic, 364 yds/333 m, 7 oz/198 g):
- Regular Dog: Color (A) Soft White OR Aran OR Color of choice, used approx. 239 yds/219 m
- Fluffy Dog: Color (A) Soft White OR Aran, yards, used approx. 499 yds/456 m, Color (B) Black OR Cafe Latte, used approx. 230 yds/186 m
- Collar: Color (C) Ranch Red OR Royal OR Dark Orchid OR Color of choice, used approx. 10 yds/9 m, Color (D) Black, used approx. 3 yds/3 m
Notes:
- This pattern is written using US crochet terminology. I chose to use a size E crochet hook. That said, the ultimate desired result is to achieve a tight crochet fabric that when stuffed will not allow the stuffing show through. If a different sized hook works better for you, then, by all means, use it! Do note, however, that if you change the hook size or the type of yarn you are using, that this will have an effect on the size and look of your finished item.
- This pattern is written in rounds, except for a portion of the hind legs. It will be helpful to place a stitch marker at the beginning stitch of the round and move it up as you start each additional round.
- At the end of each round, I will note in parenthesis how many stitches you should have once completed.
- Further design notes will be provided throughout the pattern to help aid in construction. It will be important to read them.
- The first part of the pattern will give instructions on how to make the dog without the fur and then if desired, how to add more yarn to this base to make it furry.
Abbreviations, Notes and Tips:
- Rnd(s): Rounds
- sc2tog: Single crochet 2 stitches together.
- dec: Single crochet 2 stitches together, use front loop only.
- inc: 2 Single crochet in same stitch
- sl st: Slip Stitch
- st(s): Stitches
- []: Repeat stitches between brackets as directede
- MC: Magic Circle / adjustable ring
Sitting Puppy Dog
Instructions:
- Rnd 1: 6sc in MC (6sts)
- Rnd 2: 6 inc (12 sts)
- Rnd 3: [Sc, Inc] x6. (18 sts)
- Rnd 4: Sc, Inc, [2 sc, Inc] x 5, sc. (24 sts)
- Rnd 5: [3 Sc in the next 3sts, Inc] 6 times (30sts)
- Rnd 6: 2 sc, Inc, [4 Sc, inc] x 5, 2 sc (36sts)
- Rnd 7: [5 Sc in the next 5sts, inc] x 6 (42sts)
- Rnd 8: 3 sc, inc, [6 Sc, inc] x 5, 3 sc. (48sts)
- Rnd 9: [7 Sc, inc] x 6 (54sts)
- Rnd 10: 19 Sc, inc, [2 sc, inc] x 5, 19 sc. (60sts)
- Rnds 11-12: Sc in each st around (60sts)
- Rnd 13: 23 Sc, dec, [6 sc, d] x 2, 19 sc.(57sts)
- Rnds 14-17: Sc in each st around (57sts for 4Rnds)
- Rnd 18: 22 Sc, dec, [5 sc, dec] x 2, 19 sc. (54sts)
- Rnds 19-22: Sc in each st around (54sts for 4Rnds)
- Rnd 23: [7 Sc, sdec] x 6. (48sts)
- Rnds 24-26: Sc in each st around (48sts for 3Rnds)
- Rnd 27: [6 Sc, dec] x 6. (42sts)
- Rnds 28-29: Sc in each st around (42sts for 2Rnds)
- Rnd 30: [5 Sc, dec] x 6. (36sts)
- Rnds 31-32: Sc in each st around (36sts for 2Rnds)
- Fasten off. Leave a long tail for sewing.
Shape and firmly stuff your piece. - Rnd 1: 6 sc in MC (6sts)
- Rnd 2: 6 inc. (12sts)
- Rnd 3: [Sc, inc] x 6 (18sts)
- Rnd 4: Sc, inc, [2 Sc, inc] x 5, sc. (24sts)
- Rnd 5: [3 Sc, inc] x 6. (30sts)
- Rnds 6-8: Sc in each st around (30sts for 3Rnds)
- Rnd 9: 5 dec, 20 sc. (25sts)
- Rnd 10: dec, sc, dec, 20 sc. (23sts)
- Rnd 11: [dec] x 2, 19 sc. (21sts)
- Rnd 12: dec, 19 sc. (20sts) Begin to firmly stuff and shape your piece and continue to do so as you progress.
- Rnds 13-21: Sc in each st around (20sts for 9Rnds)
- Fasten off, leaving a long tail if making Leg 1 and set it aside. If making Leg 2 continue as directed below.
- Rnd 22: 6 Sc, leave the remaining stitches unworked (6sts) >Design Note: These 6 stitches should make it so your hook is now at the front inner side of the leg so that when you place the other leg next to it you will be able to join them together nicely. You should be able to join to the 2nd to last st on Leg 1 (stitch number 19) and have both feet facing forward. If this is not the case then it’s likely that our tensions are different. Not a big deal, simply add or remove stitches until you are lined up as described.
- Rnd 23: Join Leg 2 to Leg 1 with a sc into st 19 of Leg 1 (Two stitches back from where you originally fastened off). Mark this stitch! This is the new starting point for the round. You can remove any other stitch markers that you may have in your work, sc in the remaining 19sts on Leg 1. You’re now going to join back onto Leg 2 with a sc in the st right next to where you attached to Leg 1 and then in each of the remaining 19sts (40sts total) >Design Note: There will likely be a small hole in between the two pieces where they were joined. You’ll take care of this in a moment.
- Rnds 24-25: Sc in each st around (40sts for 2Rnds) >Design Note: If on Rnd 24 you happen to be coming up one st short, watch out for st number 21 at the center back. With the way the piece forms, it likes to hide.
- Rnd 26: 15 Sc, stop and count sts 16-25, put a stitch marker in the 16th and the 25th st (your 10 skipped sts), now pick up your body and line up your skipped sts. Sc into the st directly left of your stitch marker on the body and then in each st around the body until you get to your second stitch marker (a total of 26sts between the stitch markers on the body and 41sts total for the row thus far). Now you’re going to join the body back onto the other side of the legs.
- Rnd 26 continued: Sc into the st directly left of the stitch marker on the leg, and sc each of the remaining 14sts. (56sts total) >Design Note: You can now remove all the stitch markers other than the one that marks your first stitch of the round.
- Rnd 27: [5 Sc, dec] x 8. (48sts) >Design Note: The sts where you joined to the body/leg may look smaller/different than those around them. If your stitch count is off you may be accidentally passing over them.
- Rnd 28: Sc in each st around (48sts) Okay, now you’re going to take a minute to stitch the body and legs together at the point where you skipped the 10 stitches. I used the tail left on the body. On the inside of your dog (as opposed to the right side) work through the top sts on both the body and the legs and whip stitch them together. Because the tail is in the middle you will need to work one direction, weave back to the center and then stitch up the other side, or get a new length of yarn and stitch it up.
- Rnds 29-30: Sc in each st around (48sts for 2Rnds)
- Rnd 31: [5 Sc, dec] x 2, 22 sc, dec, 3 sc, dec, 5. (44sts)
- Rnd 32: 10 Sc, dec, 21 sc, dec, 9 sc. (42sts)
- Rnd 33: [4 Sc, dec] x 3, 14 sc, dec, 2 sc, dec, 4 sc. (37sts)
- Rnd 34: 9 Sc, dec, 17 sc, dec, 7 s. (35sts) Continue to firmly stuff and shape the body cavity as you go.
- Rnd 35: 8 Sc, dec, 18 sc, dec, 5 sc. (33sts)
- Rnd 36: [8 Sc, dec] x 2, 5 sc, dec, 6 sc. (30sts)
- Rnd 37: Sc in each st around (30sts) Sl st to the first st, fasten off, leaving a tail for sewing the head to the body.
- Rnd 1: 6 sc in MC. (6sts)
- Rnd 2: 6 inc. (12sts)
- Rnd 3: [Sc, Inc] x6. (18 sts)
- Rnd 4: Sc, Inc, [2 sc, Inc] x 5, sc. (24 sts)
- Rnd 5: [3 Sc in the next 3sts, Inc] 6 times (30sts)
- Rnd 6: 2 sc, Inc, [4 Sc, inc] x 5, 2 sc (36sts)
- Rnd 7: [5 Sc in the next 5sts, inc] x 6 (42sts)
- Rnd 8: 3 sc, inc, [6 Sc, inc] x 5, 3 sc. (48sts)
- Rnd 9: [7 Sc, inc] x 6 (54sts)
- Rnds 10-12: Sc in each st around (54sts for 3Rnds)
- Rnd 13: [8 Sc, inc] x 6. (60sts)
- Rnds 14-20: Sc in each st around (60sts for 7Rnds)
- Rnd 21: [8 Sc, dec] x 6. (54sts)
- Rnds 22-24: Sc in each st around (54sts for 3Rnds)
- Rnd 25: [7 Sc, dec] x 6. (48sts)
- Rnd 26: [6 Sc, dec] x 6. (42sts)
- Rnd 27: [5 Sc, dec] x 6. (36sts) >Design Note: Now would be a great time to insert your eyes. I place mine between Rnds 14 and 15 and about 8sts apart. Note that getting the 15 mm posts through the tightly crocheted fabric was a bit of a wrestling match. Be determined to win! It helped me to take my chopstick and insert it into the space where I wanted the eye to go so that is expanded some, but even then, there was a bit of a struggle to get the post through. Using smaller eyes is an option, but my preference was the look of the 15 mm sized eye.
- Rnd 28: [4 Sc, dec] x 6. (30sts)
- Rnd 29: [3 Sc, dec] x 6. (24sts)
- Rnd 30: [2 Sc, dec] x 6. (18sts)
- Rnd 31: [Sc, dec] x 6. (12sts)
- Rnd 32: [Sc, dec] x 4. (8sts) Sl st to the first st, fasten off, leave a tail for stitching up the hole. > Design Tip: I think the hole closes more nicely if you close it with your tapestry needle, working in the front loops only and work with your needle from the inside of the hole out in each stitch around until the hole is completely closed. Tie off. Bury your yarn end and cut off any excess.
- Ch 6
- Rnd 1: Working around both sides of the chain, starting by working in the back bars of the chain, inc in the 2nd ch from the hook, 3 sc, 3sc in the last st (you’ve now rounded the corner and completed the first st on the other side of the chain), 4 sc. (12sts)
- Rnd 2: Sc, inc, 3 sc, inc, sc, inc, 3 sc, inc. (16sts)
- Rnd 3: 2 Sc, inc, 3 sc, inc, 3 sc, inc, 3 sc, inc, sc. (20sts)
- Rnd 4: [Sc, inc] x 10. (30sts)
- Rnd 5: Sc, inc, 2 sc, 3sc in the next st, 8 sc, 3sc in the next st, 2 sc, inc, 2 sc, 3sc in the next st, 8 sc, 3sc in the next st, sc.(40sts)
- Rnds 6-8: Sc in each st around (40sts for 3Rnds)
- Rnd 9: [6 Sc, dec] x5. (35sts) Sl st to the first st, fasten off, leaving a tail for stitching the muzzle to the face.
- Rnd 1: 6 sc in MC. (6sts)
- Rnd 2: 6 inc. (12sts)
- Rnd 3: [Sc, Inc] x6. (18 sts)
- Rnd 4: Sc, Inc, [2 sc, Inc] x 5, sc. (24 sts)
- Rnds 5-6: Sc in each st around (24sts for 2Rnds)
- Rnd 7: [3 Sc in the next 3sts, Inc] 6 times (30sts)
- Rnds 8-11: Sc in each st around (30sts for 4Rnds)
- Rnd 12: [3 Sc, dec] x 6. (24sts)
- Rnds 13-20: Sc in each st around (24sts for 8Rnds)
- Rnd 21: [10 Sc, dec] x 2. (22sts)
- Rnd 22: Sc in each st around (22sts)
- Rnd 23: [9 Sc, dec] x 2 . (20sts)
- Rnd 24: Sc in each st around (20sts)
- Rnd 25: [8 Sc, dec] x 2. (18sts)
- Rnd 26: [7 Sc, dec] x 2. (16sts) Hold the top edges together and sc them together (8sts)
- Rnd 1: 6 sc in MC. (6sts)
- Rnd 2: 6 inc. (12sts)
- Rnd 3: [Sc, inc] x 6 (18sts)
- Rnd 4: Sc, inc, [2 Sc, inc] x 5, sc. (24sts)
- Rnd 5: [3 Sc, inc] x 6. (30sts)
- Rnds 6-8: Sc in each st around (30sts for 3Rnds)
- Rnd 9: [dec] x 5, 20 sc. (25sts)
- Rnd 10: dec, sc, dec, 20 sc. (23sts)
- Rnd 11: [dec] x 2, 19 sc. (21sts)
- Rnd 12: dec, 19 sc. (20sts) Begin to firmly stuff and shape your leg. Continue to do so as you go.
- Rnds 13-18: Sc in each st around (20sts for 6Rnds) >Design Note: The rest of the leg will be worked in rows. Turn and ch1 at the end of each row
- Row 19: 12 Sc, leave the remaining sts unworked >Design Note: The 12sts that you just worked should be from about the front center to the back center of the piece.
- Row 20: 11 Sc, leave the last st unworked (11sts)
- Rows 21-22: Sc in each st across (11sts for 2 Rows)
- Row 23: dec, 7 sc, dec. (9sts)
- Row 24: dec, 5 sc, dec. (7sts)
- Row 25: dec, 3 sc, dec. (5sts)
- Row 26: dec, sc, dec. (3sts) Fasten off. Leave a tail for attaching the leg to the body.
- Rnd 1: 6 sc in MC. (6sts)
- Rnd 2: 6 inc. (12sts)
- Rnd 3: [Sc, inc] x 6 (18sts)
- Rnd 4: Sc, inc, [2 Sc, inc] x 5, sc. (24sts)
- Rnd 5: [3 Sc, inc] x 6. (30sts)
- Rnds 6-8: Sc in each st around (30sts for 3Rnds)
- Rnd 9: [dec] x 5, 20 sc. (25sts)
- Rnd 10: dec, sc, dec, 20 sc. (23sts)
- Rnd 11: [dec] x 2, 19 sc. (21sts)
- Rnd 12: dec, 19 sc. (20sts) Begin to firmly stuff and shape your leg. Continue to do so as you go.
- Rnds 13-19: Sc in each st around (20sts for 6Rnds) >Design Note: The rest of the leg will be worked in rows. Turn and ch1 at the end of each row
- Row 20: Turn, ch1, 11 sc, leave the rest unworked (11sts)
- Rows 21-22: 11 Sc. (11sts for 2 Rows)
- Row 23: dec, 7 sc, dec. (9sts)
- Row 24: dec, 5 sc, dec. (7sts)
- Row 25: dec, 3 sc, dec. (5sts)
- Row 26: dec, sc, dec. (3sts) Fasten off. Leave a tail for attaching the leg to the body.
- Rnd 1: 5 sc in MC. (5sts)
- Rnd 2: 4 Sc, inc. (6sts)
- Rnd 3: 5 Sc, inc. (7sts)
- Rnd 4: 6 Sc, inc. (8sts)
- Rnd 5: 7 Sc, inc. (9sts)
- Rnd 6: Sc in each st around (9sts) Begin to stuff and shape your tail. Continue to do so as you go.
- Rnd 7: 8 Sc, inc. (10sts)
- Rnd 8: Sc in each st around (10sts)
- Rnd 9: 9 Sc, inc. (11sts)
- Rnd 10: Sc in each st around (11sts)
- Rnd 11: 10 Sc, inc. (12sts)
- Rnd 12: Sc in each st around (12sts)
- Rnd 13: 11 Sc, inc. (13sts)
- Rnd 14: Sc in each st around (13sts)
- Rnd 15: 12 Sc, inc. (14sts)
- Rnd 16: Sc in each st around (14sts)
- Rnd 17: 13 Sc, inc. (15sts) Sl st to the first st, fasten off, leaving a tail for attaching to the body.
Body
Using Color AFront Legs
Using Color A, Make 2>Design Note: You will be making two front legs. For the first leg, you will fasten off when noted to do so. With the second leg, you will NOT fasten off.
Now is a good time to use the tail you left when you fastened off Leg 1 and use it to sew up the little hole between the legs.
Attaching the Legs and Body Together
Okay, now you’re going to attach the legs to the body. You’re going to skip 10sts on the body and 10sts on the legs. To do this you’re going to need to figure out a few placement points. Get two stitch markers ready and I’ll walk you through it.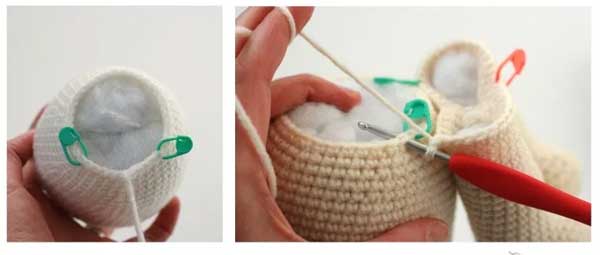
Placement of legs on body
The picture above left depicts placing the stitch markers on the body for the stitches that will be skipped. The picture on the right depicts the step in Rnd 26 where you first join the legs to the body.
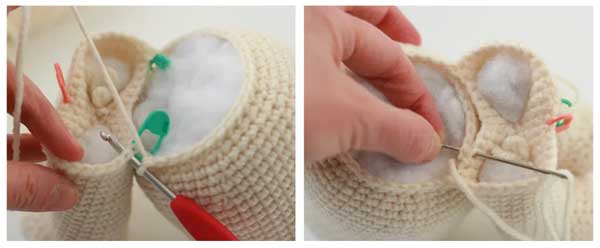
Sewing it together
The picture above left depicts the step in Rnd 26 where you’ve worked around the back of the body and are now joining back onto the leg. The picture on the right shows stitching the inside of the legs together after Rnd 28.
Determining Where to Place Your Stitch Markers
On the body, we want to skip the front 10 sts. You’re going to use the tail on your body to help determine which 10 sts. With the tail being the center front st, count out in both directions from the tail for a total of 10sts. Place one stitch marker in the first st you will skip and another in the tenth st you will skip.
Okay, now you can set the body aside for a minute while you work on the legs. For this, you’re going to begin Rnd 26 to help identify the 10sts that you’re going to skip.
Head
Using Color A, Make 1The head is worked top-down.
Now that your eyes are inserted and in place, firmly shape and stuff your head and continue to do so as you go right up to the very end.
Muzzle
Using Color A, Make 1Ears
Using Color A, Make 2Fasten off, leaving a tail for attaching to the head.
Hind Legs
Right LegUsing Color A, Make 1
Left Leg
Using Color A, Make 1Tail
Using Color A, Make 1Assembly

Assembly
Pinning before stitching to determine the best placement is so important for creating professional-looking pieces!
>Design Tip: One of the biggest tricks to assembling amigurumi, in my opinion, is pinning your pieces and then taking the time needed to ensure that you are stitching them on in a way that you are happy with them. I’ll give you some general ideas of where I placed my pieces, but ultimately, do what looks best to you.
>Design Tip: Remember when attaching your pieces to add more stuffing each time right before closing to eliminate having a gap with no stuffing between the joined pieces.
Muzzle
Before pinning and attaching the muzzle you’ll want to make sure to add your safety nose. I placed my nose between Rnd 3 and 4 in a central position. The actual muzzle I placed about one row below the eyes.Add stuffing to your muzzle. I stuffed mine a little and then pinned it to the face for placement. After stitching for a while I added more stuffing until I was overall pleased with the appearance and firmness.
Ears
I pinned my ears on the top of the head approximately five rounds out in either direction from the very center. The ears are NOT stuffed.Tail
I placed the bottom part of the tail at Rnd 10 of the body.Hind Legs
The hind legs were probably the trickiest part for me to get placed evenly. What I found that helped me the most was to place my dog on a solid surface, like a tabletop, and look at it directly from the front. This way I could see how both legs were positioned in comparison to each other.With the hind legs, you will want to stitch all the way around the part that was worked in rows and the top part of the last round where it was left unworked. Right before closing up the leg, add stuffing to the area that was worked in rows.
Making A Fluffy Dog
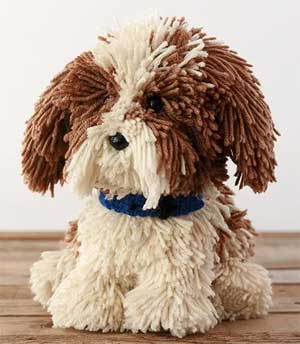
Fluffy Dog
>Design Tip: It will likely be helpful to read through this entire section before beginning so you have a better idea of the entire process and then move forward as you think best.
I’ll tell you now, turning your dog into a fluffy dog is a labor of love. It’s going to take some time, but in my opinion, it’s worth it!
If you haven’t already done so, start by completing and assembling the dog pattern above. The next step involves cutting a whole lot of lengths of yarn. My lengths of yarn are approximately 5 inches (13 cm) long. The easiest way to do this is to cut a piece of cardboard (a cereal box will do) to 2.5 inches (6 cm) tall by 5 inches (13 cm) wide.
The width of the cardboard can actually be as long or as short as you wish. You’ll be rapping your yarn around the height of the cardboard and then cutting it off the cardboard in one place, leaving pieces that are about 5 inches (13 cm) in length.
Personally, I placed my yarn tail at the bottom of the cardboard rectangle, wrapped it around about 50 times and then slipped my scissors between the cardboard and the yarn at the very bottom and cut it there. This way no yarn was wasted.
How many lengths of yarn will you need? Well, this will vary some. I advise you to think about the pattern that you want on your dog. Perhaps you have a dog and you’d like to mimic their pattern. You could also look online at dogs, or just make up your own.
Call me crazy, but I went ahead and counted the strands as I went to give you an idea of how many I used in my design. Exactly how many you need may vary widely, so it may be a good idea to cut quite a few to get you started and then cut more as you go along. For the brown and tan dog, I cut 1,734 strands of Color A and 1,418 strands of Color B. Like I said, a labor of love because now that they’re cut it’s time to loop them onto the dog, but it’s gonna be worth it!
I’m going to give you a general idea of my process for looping, but if you find a better method, by all means, use it.
I personally started my loops around the eyes and the nose, using Color B. This is a tricky area to work around because the eyes and nose are attached there. Work as closely as you can, even sticking your hook under the edges if you can, all the way around, trying to completely fill in the space. Personally, my goal was to not have any Color A showing through.
Once this is done you can really start working wherever you want. Personally, I just continued working on the face and head in a combination of Color A and Color B (as I’d decided based on my desired pattern) and then moved out to the other parts of the body. The whole bottom portion of my dogs are worked in Color A so I opted to fill in most of this color first and then went in with Color B.
Let’s Talk About How to Make Loops
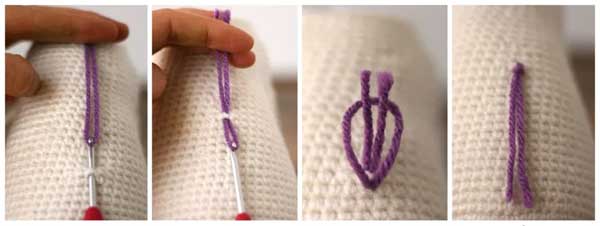
Making Loops
- Picture 1: The loops are placed around one complete stitch in a row. Determine where the loop will be placed, insert the hook from the bottom of the stitch, around the back, and back up at the top of the stitch. Fold the length of yarn in half and hook it onto the hook.
- Picture 2: Pull the length of yarn through the stitch about halfway.
- Picture 3: Remove the hook and take the loop, placing it up over both of the yarn tails.
- Picture 4: Pull on the yarn tails at the same time to tighten and secure the loop.
Let’s Talk About Yarn Loop Placement
Other than right around the eyes and the nose where I placed Color B as solidly as possible, I worked the rest of the loops around every other row of stitches for the most part. I felt this provided adequate coverage and fluffiness. If a spot looked a little bare than I added a few loops along parts of the skipped row, but not complete rows. That said if you want an even fluffier dog simply add more loops everywhere.There were a few spots that I opted to leave unworked completely. The first of these was the 5Rnds on the bottom of each of the feet. The second is underneath each of the ears. For the ear, I worked 2sts on either edge of the underside of the ear and then a couple of complete rows at the very bottom, but I then left the rest of the middle underside of the ear alone.
Let’s Talk About Blending
To me, stopping Color A and just beginning with Color B looked too abrupt in some ways. To eliminate this and to create a “blend” with the yarns, about 2 rows before I switched to Color B I worked those two (or so) rows differently. I kept them primarily Color A, but every third stitch or so I made it Color B. Then on the next row I did the same thing but made sure not to line up any of the Color B stitches. After this, I switched fully to Color B to finish out my desired pattern. Blending accomplished!Another thing I did when I wasn’t quite satisfied with how the blending looked was to loop in either Color A or Color B (depending on what was needed to make a better blend) onto some of the stitches in the rows that were skipped.
Trimming
Making A Fluffy Dog
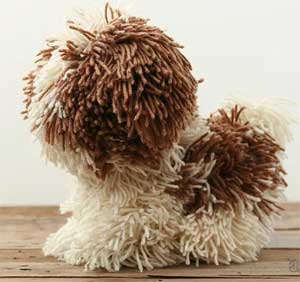
Blending the Colors & Trimming
There’s a super cute face hidden under all that fluff! Let’s find it!
This part is both fun and a bit messy. Be prepared to have yarn fluff everywhere! How you decide to sculpt your dog is going to be left up to you for the most part, but I’ll give you a few tips.
- Get a clear picture in your head (and even better an actual picture) of how you want your dog to look.
- Start with the face and then the front legs. Once satisfied with these, move on to other parts.
- Trimming less and in multiple passes is probably always the best idea. The hair obviously won’t grow back so if you take off small bits at a time as opposed to large, deep chunks it’s easier to fix if needed. That said if you totally dislike an area that you cut you can make more loops and switch them out, but this likely won’t be too fun.
- Use your initial trimming passes to add shape to your dog and then focus on more detailed trimming.
- Sometimes it’s hard to know when to stop. Take your time. Walk away if you’re feeling frustrated or don’t know exactly what you want to do next.
- Have fun! All dogs look different. Yours will be unique no matter what!