Giraffe
by Arzu Hand Made Mania Shop on ETSY.COM
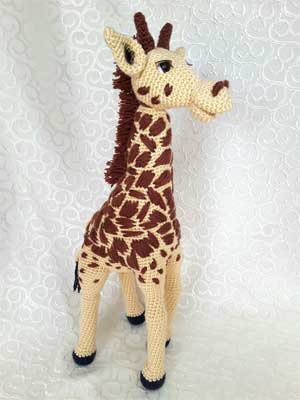
Giraffe
Finished Size: 14"
Materials:
- Acrylic yarn CYC #2 - Sport.
Brown, Beige, Black - Safety eyes, 10 mm
- Doll eyelashes
- Crochet hook 2.5 mm
- Fiberfill
- Weights for feet. Pennies, bb shot, etc.
- Cardboard for insoles to flatten the bottoms of feet.)
- Wire and or sticks for armature.
Instructions:
Head
Start with the muzzle: two parts, large and small.- Small Part: With beige, MR and 6 sc.
- Rnd 1: 6 ScInc. [12]
- Rnd 2: (Sc, Inc)*6. [18]
- Rnd 3: (8 Sc, Inc)*2. [20]
- Rnd 4: 20 Sc. [20]
- Rnd 5: (Sc, Dec)*6, 2 Sc. [14]
- Rnd 6: (Sc, Dec)*4, 2 Sc. [10] Small Part is ready. Cut yarn and leave long tail for sewing.
- Rnd 1: 6 ScInc. [12]
- Rnd 2: (Sc, Inc)*6. [18]
- Rnd 3: (2 Sc, Inc)*6. [24]
- Rnd 4-7: 24 Sc. [24]
- Rnd 8: (2 Sc, Dec)*6. [18]
- Rnd 9: (Sc, Dec)*6. [12] Large part ready. Do NOT cut yarn.
- Rnd 1: Sc 15. [15] Note: The number of SCs may vary. However, you must reach this amount on the next round by increasing or decreasing.
- Rnd 2: (2 Sc, Inc)*5. [20]
- Rnd 3: (2 Sc, Inc)*6, 2 Sc. [26]
- Rnd 4-5: Sc 26. [26]
- Rnd 6: (12 sc, inc)*2. [28]
- Rnd 7: (13 sc, inc)*2. [30]
- Rnd 8: (14 sc, inc)*2. [32]
- Rnd 9: (15 sc, inc)*2. [34]
- Rnd 10: (16 sc, inc)*2. [36]
- Rnd 11: (8 sc, inc)*4. [40]
- Rnd 12: (9 sc, inc)*4. [44]
- Rnd 13: 44 sc. [44]
- Rnd 14: (5 sc, dec)*6, 2 sc. [38]
- Rnd 15: (4 sc, dec)*6, 2 sc. [32]
- Rnd 16: (3 sc, dec)*6, 2 sc. [26]
- Rnd 17: 26 sc. [26]
- Rnd 18: (2 sc, dec)*6, 2 sc. [20] Do NOT cut yarn. We'll work on face next.
- Rnd 1: 5 SC. [5]
- Rnd 2: 2 SC, inc, 2sc. [6]
- Rnd 3: 6 SC. [6]
- Rnd 4: 2 Sc, inc, 3sc. [7]
- Rnd 5: 3 sc, inc, 3sc. [8]
- Rnd 6: 4 sc, inc, 3sc. [9]
- Rnd 7: inc, sc, 8sc. [10] Fasten off and leave tail for sewing.
- Rnd 1-2: 6 sc. [6]
- Rnd 3: (2 Sc, Inc)*2. [8]
- Rnd 4: (3 sc, inc)*2. [10]
- Rnd 5: (4 sc, inc)*2. [12]
- Rnd 6: (5 sc, inc)*2. [14]
- Rnd 7: (6 sc, inc)*2. [16]
- Rnd 8: (7 sc, inc)*2. [18]
- Rnd 9: (8 sc, inc)*2. [20]
- Rnd 10: (9 sc, inc)*2. [22]
- Rnd 11: (10 sc, inc)*2. [24] Fasten off and leave tail for sewing. Bend ears as shown in picture below, and make several stitches to secure shape.
- Rnd 19: (sc, dec)*6, 2 sc. [14]
- Rnd 20: (sc, dec)*4, 2 sc. [10]
- Rnd 21: 5 dec. [0]
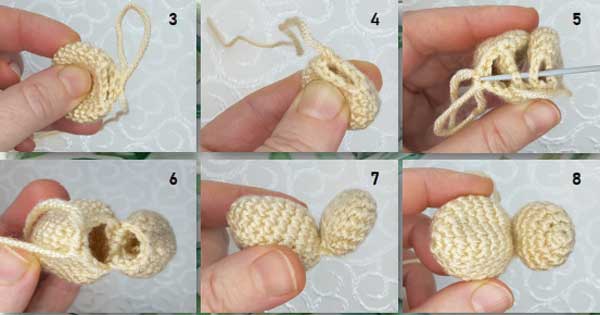
Large Part: With beige, MR and 6 sc.
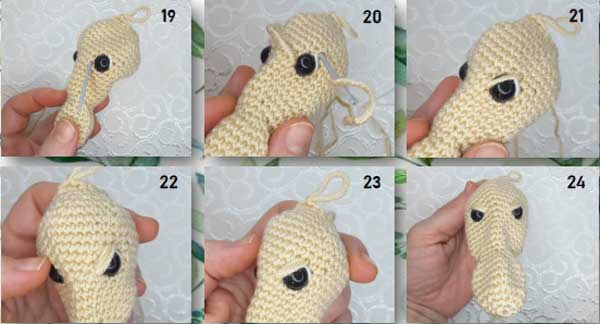
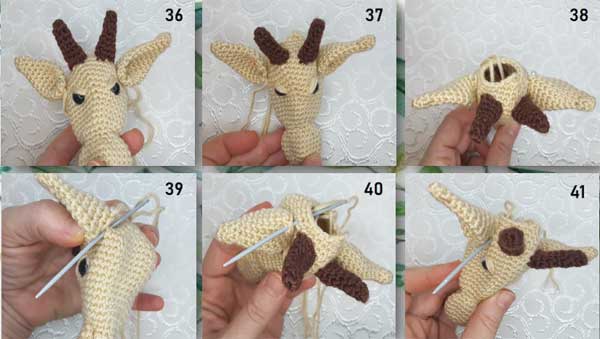
Flatten two parts as shown in pictures 3 & 4.
Using yarn tail of small part, sew them together.
Be sure to leave 15 stitches to be worked in next section.
Muzzle
Crochet around the parimeter of the two parts :
Eyes
Place safety eyes on face as shown in pictures below.Leave distance of 6 stitches between eyes.
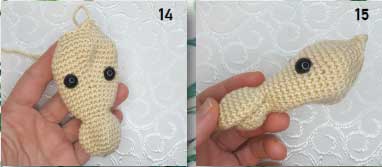
Eye Placement
With white yarn make a stitch for each eye
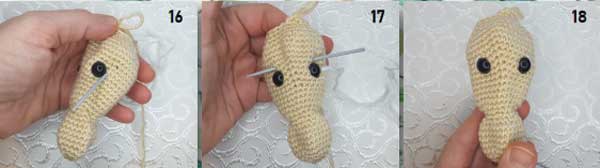
Eye Detail Stitch
With Beige yarn, make three stitches for eyelids on each eye.
Eyelids
To complete the eyes, glue the eyelashes. Or you can do it at the end of the work.
Short Hairy Horns (x2)
With Brown yarn create MR with 5sc.Using pins, attach horns to top of head just above eyes. Don't stuff.
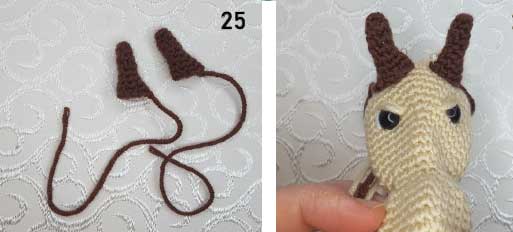
Horns
Sew horns to the head.
Sewing the horns
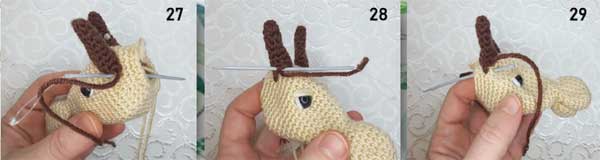
Ears
With Beige yarn, create MR with 6 sc.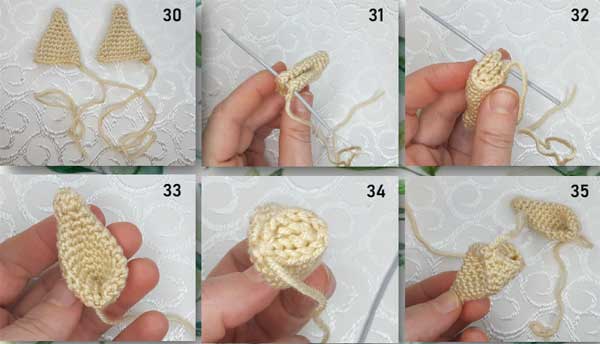
Shaping Ears
Using pins, attach ears to head and sew.
Sewing Ears
Using two brown strands of yearn embroider small spont on the sides of the head.
Sewing Spots on head
Nostrils x2
Now, we need to make the nostrils of the giraffe. For this, we will use rococo embroidery technique (Picture 48).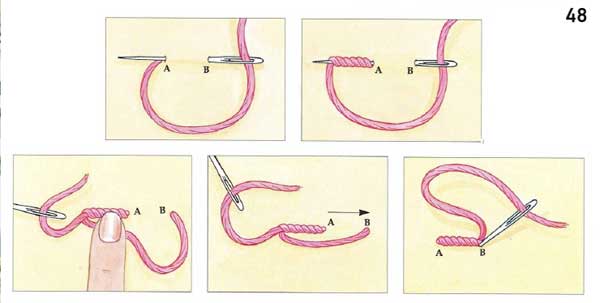
Nostrils
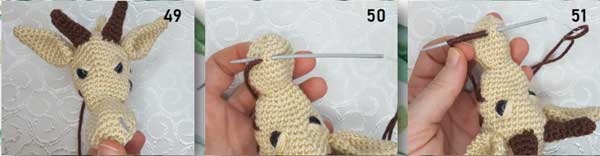
• Take Brown yarn and a yarn needle. Insert the needle as shown in the picture (Pictures 49, 50).
• Wind the yarn 15 times around the needle (Picture 51).
Sewing Nostrils
• Holding the yarn, pull out the needle (Picture 52).
• Tighten the thread (Pictures 53, 54).
• Do the same for the second giraffe’s nostril (Pictures 55-60).
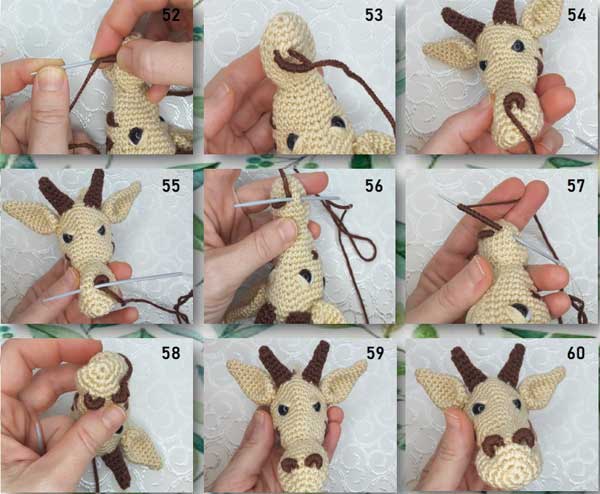
Nostrils detail
• Glue the eyelashes to the edges of the eyelids (Pictures 61-63).
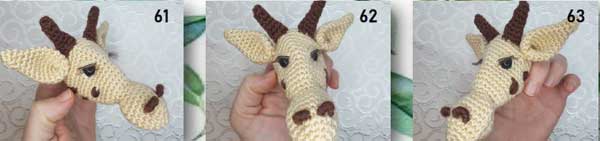
Eyelashes
• We completed the face and now, we need to close the hole of the head.
• Before closing the hole, stuff the head but not too much. Stuff the head as much as you need to give the shape of the head.
• To close the hole of the head, use the thread, that you left when crocheting the head.
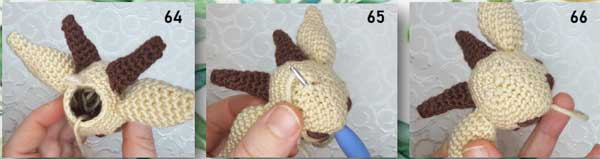
Finishing head.
Legs
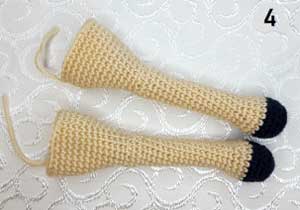
2 forelegs and two hind legsForelegs
With black, MR with 6 sc.
- Rnd 1: (inc) *6. [12]
- Rnd 2: (sc, inc) *6. [18]
- Rnd 3: blo sc 18. [18]
- Rnd 4-5: sc 18. [18] Change to beige yarn.
- Rnd 6-7: sc 18. [18] Cut cardboard to fit bottom of foot and insert.
- Rnd 8: (3 sc, dec)*3, 3sc. [15]
- Rnd 9: (2 sc, dec)*3, 3sc. [12] Stuff leg at around round 20.
- Rnd 10-27: 12 sc. [12]
- Rnd 28: (sc, inc)*6. [18]
- Rnd 29: (sc, dec)*6. [12]
- Rnd 30-35: 12 sc. [12]
- Rnd 36: (5 sc, inc)*2. [14]
- Rnd 37: (6 sc, inc)*2. [16]
- Rnd 38: (7 sc, inc)*2. [18]
- Rnd 39: (8 sc, inc)*2. [20]
- Rnd 40: (9 sc, inc)*2. [22]
- Rnd 41-42: 22 sc. [22] Fasten off and cut yarn.
- Rnd 1: (inc) *6. [12]
- Rnd 2: (sc, inc) *6. [18]
- Rnd 3: blo sc 18. [18]
- Rnd 4-5: sc 18. [18] Change to beige yarn.
- Rnd 6-7: sc 18. [18] Cut cardboard to fit bottom of foot and insert.
- Rnd 8: (3 sc, dec)*3, 3sc. [15]
- Rnd 9: (2 sc, dec)*3, 3sc. [12] Stuff leg at around round 20.
- Rnd 10-25: 12 sc. [12]
- Rnd 26: (sc, inc)*6. [18]
- Rnd 27: 18 sc. [18]
- Rnd 29: (5 sc, inc)*2. [14]
- Rnd 30: (6 sc, inc)*2. [16]
- Rnd 31: (7 sc, inc)*2. [18]
- Rnd 32: (8 sc, inc)*2. [20]
- Rnd 33: (9 sc, inc)*2. [22]
- Rnd 34: (10 sc, inc)*2. [24]
- Rnd 35: (11 sc, inc)*2. [26]
- Rnd 36: (12 sc, inc)*2. [28]
- Rnd 37-40: 28 sc. [28] Fasten off and cut yarn.
- Rnd 1: inc, 8 sc, 3 sc in next chain, 10 sc. [23]
- Rnd 2: 2 inc, 9sc, 3inc, 8sc, inc. [29]
- Rnd 3: 3 sc, 12 sc, 3 inc, 11 sc. [35]
- Rnd 4: sc, 4 inc, 14 sc, 4 inc, 12 sc. [43]
- Rnd 5: 3 sc, (inc, sc)*3, 15 sc, (inc, sc)-3, 13 sc. [49]
- Rnd 6: 4 sc, (inc, sc)*4, 15 sc, (inc, sc)*4, 14 sc. [57] We will attach legs in next round.
- Rnd 7: sc, attach forleg with next 5 sc, 2 sc,
attach second foreleg with next 5 sc, 12 sc,
attach hind leg with next 9 sc, 5 sc,
attach second hind leg with next 9 sc, 9sc. [57] - Rnd 8: dec, 16 sc (around first foreleg)
2 sc, 16 sc (around second foreleg), dec, 10 sc,
ded, 17 sc (first hind leg), dec, 3 sc, dec
17 sc (second hind leg), dec, 8 sc. [95] - Rnd 9-10: 95 sc. [95]
- Rnd 11: dec, 33sc, dec, 18 sc, dec, 19 sc, dec, 17 sc. [91] Rnd 11 decreases must be in places shown in picture 23.
- Rnd 12: 64 sc, dec, 25 sc. [90] Location of decreases shown in picture 24.
- Rnd 13: 63 sc, dec, 25 sc. [89] Decrease location shown in picture 24.
- Rnd 14: 63 sc, dec, 24 sc. [88]
- Rnd 15: 62 sc, dec, 24 sc. [87]
- Rnd 16-17: 87 sc. [87]
- Rnd 18: 45 sc, dec, 15 sc, dec, 15 sc, dec, 6sc. [84] Decreased are at center back and just in front of hind leg attachments.
- Rnd 19: 60 sc, 2dec (at center back), 20 sc. [82]
- Rnd 20: 56 sc, 4 dec (at center back), 18 sc. [78]
- Rnd 21: 7 sc, dec, 20 sc, dec, 27 sc dec, 18 sc. [75] Decreases are at center sides of forelegs and center back.
- Rnd 22: 5 sc, dec, 22 sc, dec, 24 sc, dec, 18 sc. [72] Decreases are at center sides of forelegs and center back.
- Rnd 23: 52 sc, 2 dec, 16 sc. [70] Decreases at center back for this and remainder of body.
- Rnd 24: 51 sc, 2 dec, 15 sc. [68]
- Rnd 25: 50 sc, 2 dec, 14 sc. [66]
- Rnd 26: 49 sc, 2 dec, 13 sc. [64]
- Rnd 27: 48 sc, 2 dec, 12 sc. [62]
- Rnd 28: 47 sc, 2 dec, 11 sc. [60]
- Rnd 29: 46 sc, 2 dec, 10 sc. [58]
- Rnd 30: 45 sc, 2 dec, 9 sc. [56] Complete stuffing the legs.
- Rnd 31: 44 sc, 2 dec, 8 sc. [54]
- Rnd 32: 43 sc, 2 dec, 7 sc. [52]
- Rnd 33: 42 sc, 2 dec, 6 sc. [50]
- Rnd 34: 41 sc, 2 dec, 5 sc. [48]
- Rnd 35: 40 sc, 2 dec, 4 sc. [46]
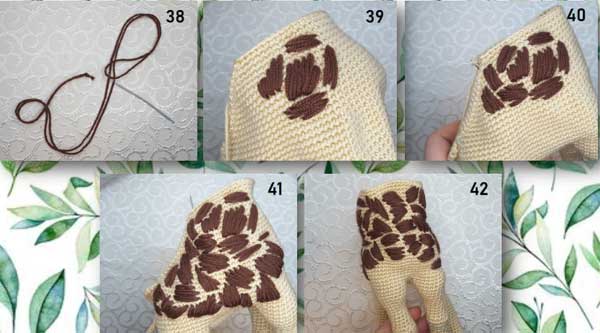
- Rnd 36: 39 sc, 2 dec, 3 sc. [44] Now we start embroidering large spots. For this, take Brown yarn and a yarn needle. Using 2 threads together, make stitches close to each other. (Pictures 38-42).
- Rnd 37: 38 sc, 2 dec, 2 sc. [42]
- Rnd 38: 37 sc, 2 dec, 1 sc. [40]
- Rnd 39: 36 sc, 2 dec. [38]
- Rnd 40: 36 sc, dec. [37]
- Rnd 41: dec, 35 sc. [36]
- Rnd 42-43: 36 sc. [36]
- Rnd 44: dec, 34 sc. [35]
- Rnd 45: dec, 33 sc. [34]
- Rnd 46: 34 sc. [34] Embroider spots on neck, and stuff.
- Rnd 47: dec, 32 sc. [33]
- Rnd 48: dec, 31 sc. [32]
- Rnd 49: dec, 30 sc. [31]
- Rnd 50: dec, 29 sc. [30]
- Rnd 51: dec, 28 sc. [29]
- Rnd 52: dec, 27 sc. [28]
- Rnd 53: dec, 26 sc. [27]
- Rnd 54: dec, 25 sc. [26]
- Rnd 55: dec, 24 sc. [25]
- Rnd 56: 25 sc. [25]
- Rnd 57: (3 sc, dec) *5. [20] Fasten off and leave long tail for sewing. Cut yarn.
Insert weight in foot.
Note: front legs are two rounds longer than hind legs aid balance.

Forelegs |
 Hind legs
 |
Hind legs
With black, MR with 6 sc.
Insert weight in foot.
Body
With Beige yarn chain 12. Start in second chain from hook.Work around the chain.
• The fore legs will be attched to the body through the 5 holes shown in picture 8, starting with a hole with a hook in it.
• The hind legs will be attched to the body through the 9 holes shown in picture 9, starting with a hole with a hook in it.
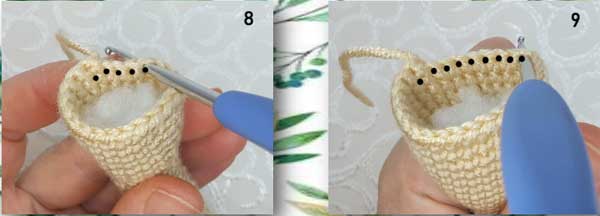
Attaching Legs
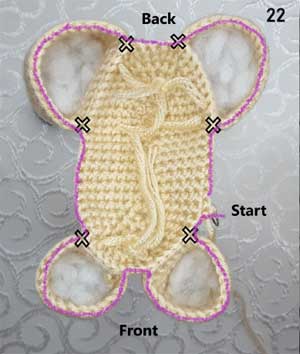
Round 8 After the attachment of legs
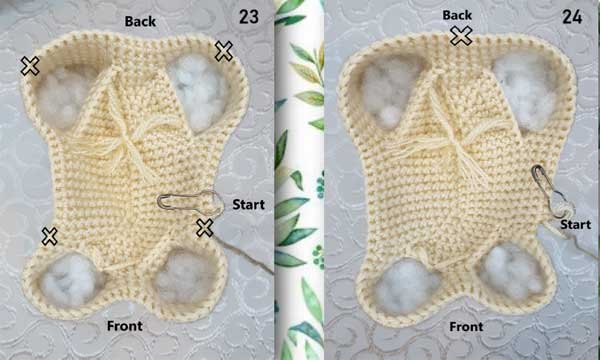
Location of decreases in rnds 11 and 12.
Interrupt body work to make tail:
Chain 20 with beige yarn. Draw two pieces of black yarn 4 inches long through the last loop of the chain and tie them tightly.
Brush thie black to make it fluffy.
Insert hook into second chain from end and work 18 scs into next 18 chains. Sew the two sides of the beige tail together to make it round.
Tie the tail inside center back one round below edge.
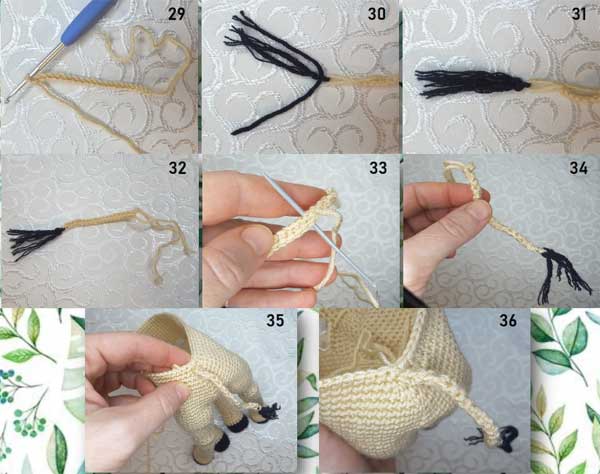
Create and place the tail
Embroider spots
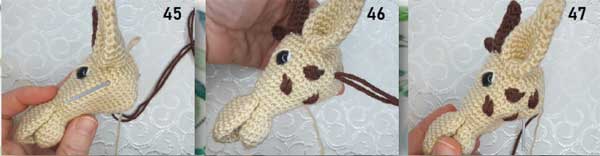
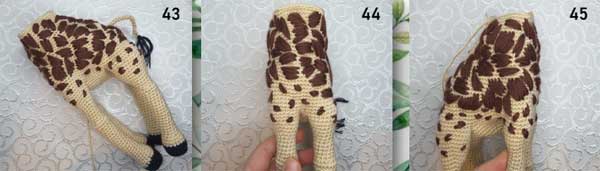
After finishing large spots, embroider small spots around the legs. (Pictures 43-45).
Leg Spots
Stuff the body and continue crocheting.
Complete embroidering neck and stuff it. Add armature material.
Mane:
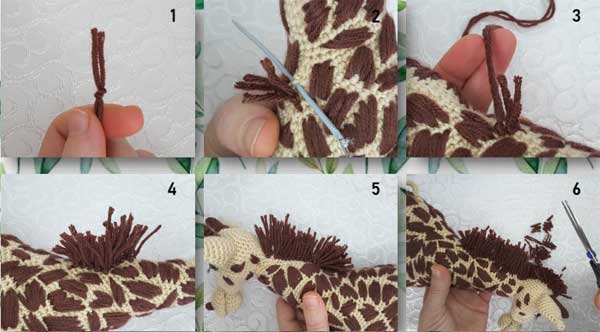
- We will use Brown yarn to make the mane.
- Start making the mane from the center of the back.
- Take a yarn needle with a thread of Brown yarn and make a knot (Picture 1). The knot should not be more than 2 cm (1 inch) closer to the ends.
- Insert a yarn needle into the body and pull it out from the nearest hole (Picture 2). The first knot should be outside.
- Make the second knot with this thread (Picture 3) and cut the yarn (the ends should be the same length).
- Work 2 rows wide from bottom to top (Pictures 4, 5).
- After finishing making the mane, cut it to 1 cm (0.5 inches) (Picture 6).
Mane
Brush the mane to make it fluffy (Pictures 7, 8).
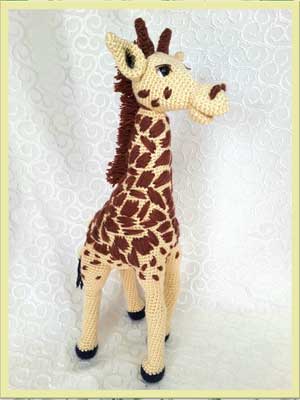
TA DA!! Here he is!