Software Catalog:
Hide the Details With Automation

|
The previous section finished our interactive application. To make it work the user must deal with the Microsoft Access database window and several confusing objects. To make the application more convenient and user-friendly we will build a main menu form to allow the user to simply push a button to access the wanted part of the application. To automate an application we first need to look at all the tables, forms, queries, reports, macros, and programming code and decide exactly which of these objects the user will use directly. Then we build a form with command buttons linked to them. Here we go!
To begin open a new form in design view, but do not link it with any table or query. You will only see a gray grid in design view. Several properties of the form need to be adjusted to give the appearance of a regular window instead of a data form. To get the form property sheet click on the form somewhere outside the grid. Here's a list of the properties and their values: |
|
|
|
|
The picture property is where you can add a bitmap background. The remainder of the form properties are unchanged. There are a few properties of the detail section that need to be changed:
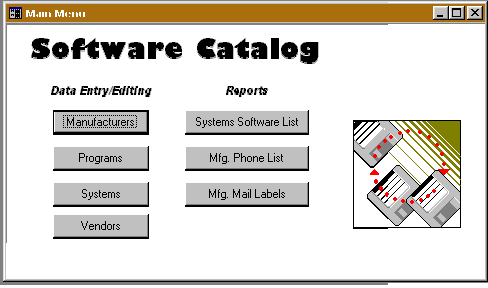
Now that we have a normal looking window instead a data window we can add the objects we need from the toolbox. Add a label near the upper left corner. Stretch it to make space for a large font, 3½" or 4" . Type Software Catalog , click outside the label and then select the label. Choose a nice looking font in a bold style and make the size about 20 points. Click the center alignment button. Drop two more labels on the form, one under the word Software and the other under Catalog. Type Data Entry/Editing in the first label and Reports in the second. Select both labels and choose a font, make it bold, italics, and centered. You can leave the default 8 point font size. Now choose the Command Button Tool from the toolbox and put 4 of them under the Data Entry/Editing label and 3 under the Reports label. Choose the first column of command buttons (shift-click them all or draw a marquee around them with your cursor). Choose Format | Align | Left. Repeat for the group under the Reports label. Be sure the side-by-side buttons are aligned horizontally (select Format | Align | Top). Click in each button to put the cursor in the button to type a caption for each, or you can do it on the property sheet for each button. Type Manufacturers in the first, Programs in the second, Systems in the third, and Vendors fourth. Caption the report buttons Systems Software List, Mfg. Phone List, Mfg. Mail Labels . You will need to adjust the widths of these fields to about 1.3", adjust the Reports label to the same width. In the associated property sheet, name each command button starting with Manufacturers name them as follows: cmdManufacturers, cmdPrograms, cmdSystems, cmdVendors, cmdSoftwareList, cmdMfgPhoneList, and cmdMfgMailLabels. Add an image control to the lower right corner of the form. Click the ellipsis at the Picture property and navigate to a bitmap you would like to display on your form. I chose Software.BMP from the collection of clipart that comes with MS Office. On my machine the location is C:\Program Files\Microsoft Office\Clipart\Popular\Software.BMP. Switching from to design view move things around until the appearance suits you. Then you're ready to write some macros to link the command buttons with the forms and reports. Open a new macro. Choose OpenForm in the Action column and choose Manufacturer Entry / Edit in the Form Name field near the bottom of the window. Save as OpenManufacturersEntry . Close the macro window. Select cmdManufacturers go to the Event page of the property sheet. Select On Click and click on the … button, then select OpenManufacturersEntry. That is all there is to it! Test your work and save. Now repeat the procedure for each of the remaining command buttons. Here's a summary: |
|
|
|
If a button doesn't work. First check to see that you linked the macro to the command button's On Click event. ***** NOT RECOMMENDED!! ***** To hide Microsoft Access details from the user we must write one more macro!
The AutoExec macro will execute automatically when you load the Software database, just like your AutoExec.BAT file (if it exists) runs when your computer boots. It will show the Main Menu window and give the user access to the forms and reports, but nothing else. To get to your database window and the remainder of the application use the Access menu choices Window | Unhide and choose Software from the popup menu. (Modern versions of Microsoft Access do not have the required Window menu to unhide the application objects.) To hide the details:
If you have been working along you now have a fully working, user-friendly Microsoft Access Application. We have explored many of the features offered by this database manager. This should be enough to get you started developing your own applications. |
|
Return to Beginning Continue Previous |
|
This document authored by Pat Tyler Copyright July 1997 |